GE PYE22KSKSS Use and Care Manual - Page 44
Troubleshooting Tips cont
 |
View all GE PYE22KSKSS manuals
Add to My Manuals
Save this manual to your list of manuals |
Page 44 highlights
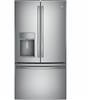
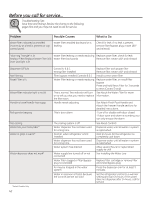
Before you call for service... Troubleshooting Tips (cont) Problem Beverage quality not as expected Possible Causes You may be using non-standard or out dated K-Cups Liquid drips from the brewer after brewer cycle is completed and the brewer is removed from the bracket It is possible for liquids to be retained by the brewer and drip when it is removed Delay when using Keurig K-cup Pod dispenser To ensure a quality beverage is delivered, a short delay is required to ensure the refrigerator is operating correctly After brewing, my powdered beverage Depending on size selected, the is not fully cleared from the used pod powder may not dissolve fully. Some powdered beverages develop into 'clumps' when left sitting for some time Brewer lid is difficult to close K-cup is not fully seated Brewer leaks during the brew cycle Trouble in closing brewer lid or damaged K-cup What to Do Recommend using official Keurig K-cups that are not past expiration and have not been damaged Use a cloth or container to capture the drips when brewer is removed Ensuring consistent, quality operation requires the refrigerator to delay dispense for a short period of time Shake the powdered pods before brewing to break up these clumps and allow better clearing. For powdered beverage with no filter, use the Cocoa cycle selection Press K-cup all the way down into the brewer prior to closing the lid. Lower needle must puncture K-cup bfore closing the brewer lid Press K-cup all the way down into the brewer prior to closing the lid. Lower needle must puncture K-cup bfore closing the brewer lid. Recommend using official Keurig K-cups that have not been damaged and have a good seal between the top cover and plastic bottom *Select Models Only 44
-
 1
1 -
2
-
3
-
4
-
5
-
6
-
7
-
8
-
9
-
10
-
11
-
12
-
13
-
14
-
15
-
16
-
17
-
18
-
19
-
20
-
21
-
22
-
23
-
24
-
25
-
26
-
27
-
28
-
29
-
30
-
31
-
32
-
33
-
34
-
35
-
36
-
37
-
38
-
 39
39 -
 40
40 -
 41
41 -
 42
42 -
 43
43 -
 44
44 -
 45
45 -
 46
46 -
 47
47 -
 48
48 -
 49
49 -
50
-
51
-
52
-
53
-
54
-
55
-
56
-
57
-
58
-
59
-
60
-
61
-
62
-
63
-
64
-
65
-
66
-
67
-
68
-
69
-
70
-
71
-
72
-
73
-
74
-
75
-
76
-
77
-
78
-
79
-
80
-
81
-
82
-
83
-
84
-
85
-
86
-
87
-
88
-
89
-
90
-
91
-
92
-
93
-
94
-
95
-
96
-
97
-
98
-
99
-
100
-
101
-
102
-
103
-
104
-
105
-
106
-
107
-
108
-
109
-
110
-
111
-
112
-
113
-
114
-
115
-
116
-
117
-
118
-
119
-
120
-
121
-
122
-
123
-
124
-
125
-
126
-
127
-
128
-
129
-
130
-
131
-
132
-
133
-
134
-
135
-
136
-
137
-
138
-
139
-
140
-
141
-
142
-
143
-
144
-
145
-
146
-
147
-
148
-
149
-
150
-
151
-
152
 |
 |
