GE PYE22PMKES Use and Care Manual - Page 29
Prepare For Installation, Replace Freezer Door, Remove Freezer Basket
 |
View all GE PYE22PMKES manuals
Add to My Manuals
Save this manual to your list of manuals |
Page 29 highlights
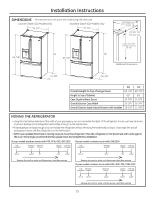
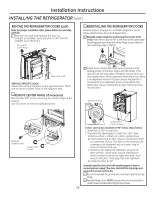
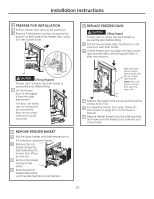
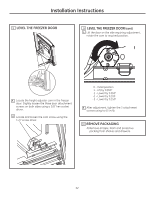
Installation Instructions 6 PREPARE FOR INSTALLATION A Pull the freezer door open to full extension. B Remove 3 attachment screws, located at the bottom on each side of the freezer door using 3/8" hex socket driver. 8 REPLACE FREEZER DOOR CAUTION Lifting Hazard Freezer door is heavy Use both hands to secure the door before lifting. A Pull the lower basket slide mechanism to full extension with both hands. B Lift the freezer door and align the tabs on the door bracket sides with the square holes in slide mechanisms. 3 Screws CAUTION Lifting Hazard Freezer door is heavy Use both hands to secure the door before lifting. C Lift the freezer door to disengage it from the slide mechanism The door can safely rest on the bottom. Do not rest the door on any other surfaces to avoid scratches. 7 REMOVE FREEZER BASKET A Pull the lower basket and slide mechanism to full extension using both hands. B Remove the top freezer drawer by fully extending the drawer then lifting up and out. C Remove the basket resting on the slides. D Push the bottom basket slides back until the slide mechanism self retracts. Align and insert tab on Freezer Door Bracket with slot on Freezer Slide Bracket. NOTE: Place one side in first and then align the other side. C Replace the attachment screws and torque the screws to 65 in-lb. D For adjusting freezer door gaps, follow the instructions on page 30 or in the Owner's Manual. E Replace freezer basket onto the slide brackets and make sure the freezer door operates and closes freely. 29
-
 1
1 -
2
-
3
-
4
-
5
-
6
-
7
-
8
-
9
-
10
-
11
-
12
-
13
-
14
-
15
-
16
-
17
-
18
-
19
-
20
-
21
-
22
-
23
-
 24
24 -
 25
25 -
 26
26 -
 27
27 -
 28
28 -
 29
29 -
 30
30 -
 31
31 -
 32
32 -
 33
33 -
 34
34 -
35
-
36
-
37
-
38
-
39
-
40
-
41
-
42
-
43
-
44
-
45
-
46
-
47
-
48
-
49
-
50
-
51
-
52
-
53
-
54
-
55
-
56
-
57
-
58
-
59
-
60
-
61
-
62
-
63
-
64
-
65
-
66
-
67
-
68
-
69
-
70
-
71
-
72
-
73
-
74
-
75
-
76
-
77
-
78
-
79
-
80
-
81
-
82
-
83
-
84
-
85
-
86
-
87
-
88
-
89
-
90
-
91
-
92
-
93
-
94
-
95
-
96
-
97
-
98
-
99
-
100
-
101
-
102
-
103
-
104
-
105
-
106
-
107
-
108
-
109
-
110
-
111
-
112
-
113
-
114
-
115
-
116
-
117
-
118
-
119
-
120
-
121
-
122
-
123
-
124
-
125
-
126
-
127
-
128
-
129
-
130
-
131
-
132
-
133
-
134
-
135
-
136
-
137
-
138
-
139
-
140
-
141
-
142
-
143
-
144
-
145
-
146
-
147
-
148
-
149
-
150
-
151
-
152
 |
 |
