GE WPDH8900JMV Owners Manual - Page 12
Care and Cleaning/General Maintenance, Clean Pump Filter, Cleaning the Door Gasket
 |
UPC - 084691178521
View all GE WPDH8900JMV manuals
Add to My Manuals
Save this manual to your list of manuals |
Page 12 highlights
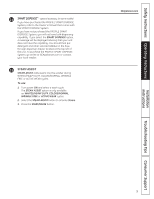
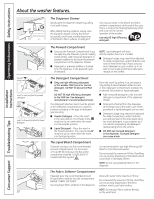
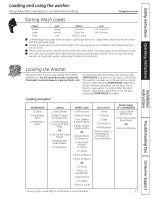
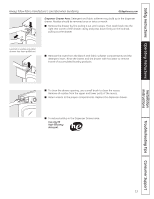
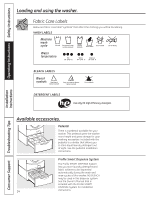
Operating Instructions Safety Instructions Loading and using the washer. Care and Cleaning/General Maintenance Exterior: Immediately wipe off any spills. Wipe with damp cloth. Do not hit surface with sharp objects. Interior: Dry around the washer door opening, flexible gasket (including attached hoses) and door glass. These areas should always be clean to ensure a water-tight seal. It is recommended to rinse the washer at least once per month with 1 cup of bleach (or other commercially available product manufactured for this purpose) poured into the prewash section of the dispenser (no clothes) using the BASKET CLEAN CYCLE (found in the SPECIALTY CYCLES menu). Check to ensure the steam nozzle is not clogged. Clean the nozzle if necessary. Moving and Storage: Ask the service technician to remove water from drain pump and hoses. Do not store the washer where it will be exposed to the weather. When moving the washer, the tub should be kept stationary by using the shipping bolts removed during installation. See Installation Instructions in this manual. If these parts are not available, they can be ordered by visiting our Website at GEAppliances.com or by calling 800.GE.CARES. Long Vacations: Be sure water supply is shut off at faucets. Drain all water from hoses if weather will be below freezing. Clean Pump Filter Due to the nature of the front-load washer, it is sometimes possible for small articles to pass to the pump. The washer has a filter to capture lost items so they are not dumped to the drain. To retrieve lost items, clean out the pump filter. 1. Using a coin in the notch on the door, open the access door. 2. Place a shallow pan or dish under the pump access door and towels on the floor in front of the washer to protect the floor. It is normal to catch about a cup of water when the filter is removed. 3. Turn the pump filter counterclockwise and remove the filter. 4. Clean the debris from the filter. Pump filter 5. Replace the filter and turn clockwise to the marked position. 6. Close the access door. Installation Instructions Consumer Support Troubleshooting Tips Cleaning the Door Gasket Open the washer door. Using both hands, press down the door gasket. Remove any foreign objects if found trapped inside the gasket. Make sure there is nothing blocking the holes behind the gasket. While holding down the door gasket, inspect the interior gasket by pulling it down with your fingers. Remove any foreign objects if found trapped inside this gasket. Make sure there is nothing blocking the holes behind the gasket. When you are finished cleaning the door gasket, remove your hands and the gaskets will return to the operating position. 12
-
 1
1 -
2
-
3
-
4
-
5
-
6
-
 7
7 -
 8
8 -
 9
9 -
 10
10 -
 11
11 -
 12
12 -
 13
13 -
 14
14 -
 15
15 -
 16
16 -
 17
17 -
18
-
19
-
20
-
21
-
22
-
23
-
24
-
25
-
26
-
27
-
28
-
29
-
30
-
31
-
32
-
33
-
34
-
35
-
36
-
37
-
38
-
39
-
40
-
41
-
42
-
43
-
44
-
45
-
46
-
47
-
48
-
49
-
50
-
51
-
52
-
53
-
54
-
55
-
56
-
57
-
58
-
59
-
60
-
61
-
62
-
63
-
64
-
65
-
66
-
67
-
68
-
69
-
70
-
71
-
72
-
73
-
74
-
75
-
76
-
77
-
78
-
79
-
80
-
81
-
82
-
83
-
84
 |
 |