Genie ReliaG 600 Owner's Manual - Page 24
Emote Control, Light Bulb/lens Installation
 |
View all Genie ReliaG 600 manuals
Add to My Manuals
Save this manual to your list of manuals |
Page 24 highlights
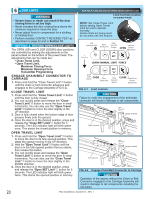
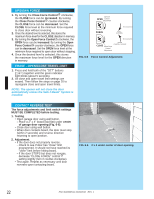
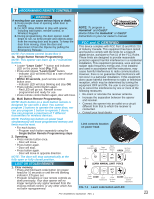
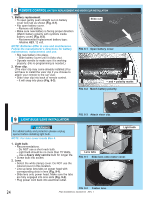
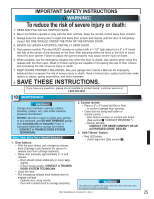
8 EMOTE CONTROL BATTERY REPLACEMENT AND VISOR CLIP INSTALLATION 1. Battery replacement. • To open gently push straight out on battery cover lock tab as shown (Fig. 8-1). • Flip open battery cover. - Remove old battery. • Make sure new battery is facing proper direction (Match battery polarity with symbols inside battery cover) (Fig. 8-2). - Recommended replacement battery type: Alkaline A23, 12 volt. NOTE: Batteries differ in care and maintenance. Follow the manufacturer's directions for battery maintenance, replacement, and use. • Slip new battery into place. - Slide battery cover until it clicks shut. • Operate remote to make sure it is working properly. (No re-programming is needed.) 2. Visor clip. (The visor clip may come already installed.)You will have to install the visor clip if you choose to attach your remote to the car visor. • Slide visor clip into back of remote control. - It will snap into place (Fig. 8-3). Slide out FIG. 8-1 Open battery cover. - and + polarity marks FIG. 8-2 Match battery polarity. 9 LIGHT BULB/LENS INSTALLATION FIG. 8-3 Attach visor clip. WARNING For added safety and protection please unplug opener before installing light bulb. NOTE: For lens cover locate Box 4. 1. Light bulb. • Recommendations. - Do NOT use a short neck bulb. - Light bulb should be no more than 75 Watts. - Use a heavy duty service bulb for longer life. • Screw bulb into socket. 2. Lens. • Select the white (lamp) cover. Do NOT use the colored cover in this location. • Line up lamp lens tabs on power head with corresponding slots in lens (Fig. 9-1). • Slide lens onto power head. Make sure the tabs are fully engaged into lens slots (Fig. 9-2). • Plug power cord back into electrical outlet. Light bulb Lens tabs FIG. 9-1 Slide lens onto motor cover. FIG. 9-2 Fasten lens. 24 PN# 3642036534, 02/26/2010 REV. 1
-
 1
1 -
2
-
3
-
4
-
5
-
6
-
7
-
8
-
9
-
10
-
11
-
12
-
13
-
14
-
15
-
16
-
17
-
18
-
 19
19 -
 20
20 -
 21
21 -
 22
22 -
 23
23 -
 24
24 -
 25
25 -
 26
26 -
 27
27 -
 28
28 -
 29
29 -
30
 |
 |
