Gigabyte 7VT600-RZ User Manual - Page 10
Step 2: Install the Central Processing Unit CPU
 |
View all Gigabyte 7VT600-RZ manuals
Add to My Manuals
Save this manual to your list of manuals |
Page 10 highlights
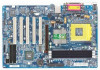
English Step 2: Install the Central Processing Unit (CPU) Before installing the processor, adhere to the following warning: 1. Please make sure the CPU type is supported by the motherboard. 2. The processor will overheat without the heatsink and/or fan, resulting in permanent irreparable damage. 3. If you do not match the CPU socket Pin 1 and CPU cut edge well, it will cause improper installation. Please change the insert orientation. 4. Apply therm al grease between the processor and cooling fan. 5. Never run the processor without the heatsink properly and firmly attached. Permanent dam age will result. 6. Please set the CPU host frequency in accordance with your processor's specifications. We don't recommend you to set the system bus frequency over the CPU's specification because these specific bus frequencies are not the standard specifications for CPU, chipset and most of the peripherals. Whether your system can run under these specific bus frequencies properly will depend on your hardware configurations, including CPU, Memory, Cards... etc. Step 2-1: CPU Installation Socket ActuationLever Figure 1. Pull the rod to the 90-degree di re ctly . Figure 2. Locate Pin 1 in the socket and look for a (golden) cut edge on the CPU upper corner. Insert the CPU into the socket. (Do not force the CPU into the socket.) Then move the socket lever to the locked position while holding pressure on the center of the CPU. Step 2-2: CPU Cooling Fan Installation Figure 1. Apply the thermal tape(or grease) to provide better heat conduction between your CPU and cooling fan. Figure 2. Fasten the cooling fan supporting-base onto the CPU socket on the motherboard. Figure 3. Make sure the CPU fan is plugged to the CPU fan connector, than the install completely. 7VT600-RZ Series Motherboard - 10 -
-
 1
1 -
2
-
3
-
4
-
 5
5 -
 6
6 -
 7
7 -
 8
8 -
 9
9 -
 10
10 -
 11
11 -
 12
12 -
 13
13 -
 14
14 -
 15
15 -
16
-
17
-
18
-
19
-
20
-
21
-
22
-
23
-
24
-
25
-
26
-
27
-
28
-
29
-
30
-
31
-
32
-
33
-
34
-
35
-
36
-
37
-
38
-
39
-
40
 |
 |
