Gigabyte A520M H User Manual - Page 23
Tweaker, CPU Clock Control, Spread Spectrum Control, CPU Ratio Mode, CCD0 CCX0/1 Ratio
 |
View all Gigabyte A520M H manuals
Add to My Manuals
Save this manual to your list of manuals |
Page 23 highlights
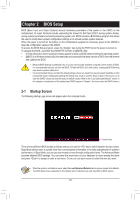
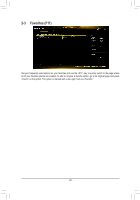
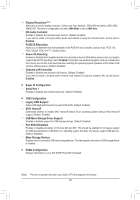
2-4 Tweaker Whether the system will work stably with the overclock/overvoltage settings you made is dependent on your overall system configurations. Incorrectly doing overclock/overvoltage may result in damage to CPU, chipset, or memory and reduce the useful life of these components. This page is for advanced users only and we recommend you not to alter the default settings to prevent system instability or other unexpected results. (Inadequately altering the settings may result in system's failure to boot. If this occurs, clear the CMOS values and reset the board to default values.) && CPU Clock Control Allows you to manually set the CPU base clock in 1 MHz increments. (Default: Auto) Important: It is highly recommended that the CPU frequency be set in accordance with the CPU specifications. && Spread Spectrum Control Enables or disables CPU/PCIe Spread Spectrum. (Default: Auto) && CPU Ratio Mode (Note) Allows you to set the core ratio for all CPU cores or individual cores. (Default: All cores) && CCD0 CCX0/1 Ratio (Note) Allows you to manually set the core ratio for the CPU CCX0, 1 cores. This item is configurable only when CPU Ratio Mode is set to Per CCX. (Default: Auto) && CPU Clock Ratio Allows you to alter the clock ratio for the installed CPU. The adjustable range is dependent on the CPU being installed. ƒƒ Advanced CPU Settings && Core Performance Boost (Note) Allows you to determine whether to enable the Core Performance Boost (CPB) technology, a CPU performance-boost technology. (Default: Auto) && SVM Mode Virtualization enhanced by Virtualization Technology will allow a platform to run multiple operating systems and applications in independent partitions. With virtualization, one computer system can function as multiple virtual systems. (Default: Disabled) (Note) This item is present only when you install a CPU that supports this feature. - 23 -
-
 1
1 -
2
-
3
-
4
-
5
-
6
-
7
-
8
-
9
-
10
-
11
-
12
-
13
-
14
-
15
-
16
-
17
-
 18
18 -
 19
19 -
 20
20 -
 21
21 -
 22
22 -
 23
23 -
 24
24 -
 25
25 -
 26
26 -
 27
27 -
 28
28 -
29
-
30
-
31
-
32
-
33
-
34
-
35
-
36
-
37
-
38
-
39
-
40
-
41
 |
 |
