Gigabyte GA-8N-SLI Manual - Page 16
Installation of Memory, Installing/Removing Cool-Plus Northbridge Cooling Fan - sli
 |
UPC - 818313002792
View all Gigabyte GA-8N-SLI manuals
Add to My Manuals
Save this manual to your list of manuals |
Page 16 highlights
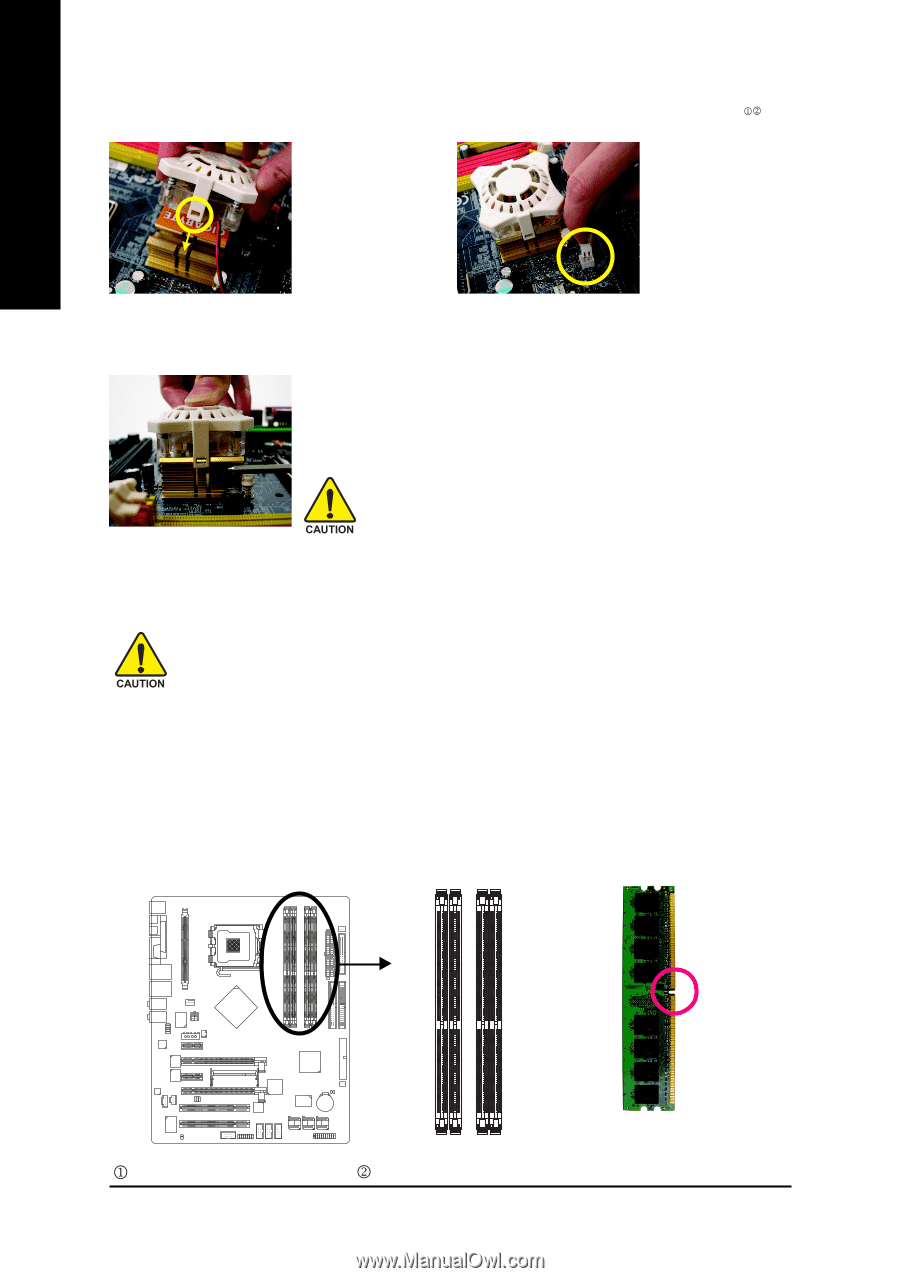
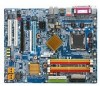
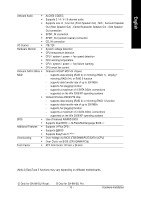
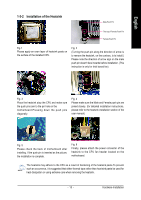
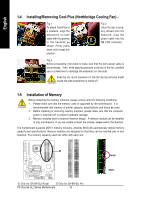
English 1-4 Installing/Removing Cool-Plus (Northbridge Cooling Fan) Fig.1 To attach Cool-Plus to a heatsink, align the extensions on both sides with the grooves in the heatsink as shown. Firmly press down until it snaps into position. Fig.2 Once the fan is properly affixed onto the heatsink, plug the power cable into the NB_FAN connector. Fig.3 Before proceeding, first check to make sure that the fan's power cable is disconnected. Then, while applying pressure to the top of the fan, carefully use a screwdriver to dislodge the extension on one side. Exerting too much pressure on the fan during removal might cause the side extensions to break-off. 1-5 Installation of Memory Before installing the memory modules, please comply with the following conditions: 1. Please make sure that the memory used is supported by the motherboard. It is recommended that memory of similar capacity, specifications and brand be used. 2. Before installing or removing memory modules, please make sure that the computer power is switched off to prevent hardware damage. 3. Memory modules have a foolproof insertion design. A memory module can be installed in only one direction. If you are unable to insert the module, please switch the direction. The motherboard supports DDR II memory modules, whereby BIOS will automatically detect memory capacity and specifications. Memory modules are designed so that they can be inserted only in one direction. The memory capacity used can differ with each slot. Only for GA-8N-SLI Royal. Only for GA-8N-SLI Pro. P4 nForce4 SLI Series Motherboard - 16 - Notch DDR II
-
 1
1 -
2
-
3
-
4
-
5
-
6
-
7
-
8
-
9
-
10
-
 11
11 -
 12
12 -
 13
13 -
 14
14 -
 15
15 -
 16
16 -
 17
17 -
 18
18 -
 19
19 -
 20
20 -
 21
21 -
22
-
23
-
24
-
25
-
26
-
27
-
28
-
29
-
30
-
31
-
32
-
33
-
34
-
35
-
36
-
37
-
38
-
39
-
40
-
41
-
42
-
43
-
44
-
45
-
46
-
47
-
48
-
49
-
50
-
51
-
52
-
53
-
54
-
55
-
56
-
57
-
58
-
59
-
60
-
61
-
62
-
63
-
64
-
65
-
66
-
67
-
68
-
69
-
70
-
71
-
72
-
73
-
74
-
75
-
76
-
77
-
78
-
79
-
80
-
81
-
82
-
83
-
84
-
85
-
86
-
87
-
88
-
89
-
90
-
91
-
92
-
93
-
94
-
95
-
96
 |
 |