Gigabyte GA-8S648FXP-RZ User Manual - Page 23
F_AUDIO Front Audio Connector, SUR_CEN, CD_IN CD Audio Line In, BAT Battery, CAUTION - buy
 |
View all Gigabyte GA-8S648FXP-RZ manuals
Add to My Manuals
Save this manual to your list of manuals |
Page 23 highlights
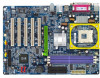
English 10) BAT (Battery) + CAUTION v Danger of explosion ifbattery is incorrectly replaced. v Replace only with the same or equivalent type recommendedbythe manufacturer. v Dispose ofusedbatteries according to the manufacturer'sinstructions. If you want to erase CMOS... 1.Turn OFFthe computer and unplugthe power cord. 2.Remove the battery, wait for 30 second. 3.Re-install the battery. 4.Plug the power cord and turn ON the computer. 11) F_AUDIO (Front Audio Connector) Ø Ifyou wantto use FrontAudio connector, you RearAudio (L) RearAudio (R) POWER GND 10 9 21 FrontAudio (L) Reserved FrontAudio (R) REF M IC mustremove 5-6,9-10 Jumper.In orderto utilize the front audio header, your chassis must have frontaudioconnector.Alsoplease make sure the pin assigmenton thecable is the sameas the pin assigmenton the MB header. To find out ifthe chassis you are buying supportfrontaudio connector,pleasecontactyourdealer.Pleasenote, you can have the alternative ofusing frontaudio connectororofusing rearaudio connectorto play sound. 12) SUR_CEN BASS_OUT SUR OUTR CENTER_OUT GND SUR OUTL 1 Ø Please contactyournearestdealerforoptional SUR_CEN cable. 13) CD_IN (CD Audio Line In) CD-L 1 GND CD-R Ø ConnectCD-ROM or DVD-ROM audio out to the connector. - 19 - Hardware Installation Process
-
 1
1 -
2
-
3
-
4
-
5
-
6
-
7
-
8
-
9
-
10
-
11
-
12
-
13
-
14
-
15
-
16
-
17
-
 18
18 -
 19
19 -
 20
20 -
 21
21 -
 22
22 -
 23
23 -
 24
24 -
 25
25 -
 26
26 -
 27
27 -
 28
28 -
29
-
30
-
31
-
32
-
33
-
34
-
35
-
36
-
37
-
38
-
39
-
40
-
41
-
42
-
43
-
44
-
45
-
46
-
47
-
48
-
49
-
50
-
51
-
52
-
53
-
54
-
55
-
56
-
57
-
58
-
59
-
60
-
61
-
62
-
63
-
64
-
65
-
66
-
67
-
68
-
69
-
70
-
71
-
72
-
73
-
74
-
75
-
76
-
77
-
78
-
79
-
80
-
81
-
82
-
83
-
84
-
85
-
86
-
87
-
88
-
89
-
90
-
91
-
92
-
93
-
94
-
95
-
96
 |
 |
