Gigabyte GA-8VT880P Combo Manual - Page 7
Auto Setup - manual
 |
View all Gigabyte GA-8VT880P Combo manuals
Add to My Manuals
Save this manual to your list of manuals |
Page 7 highlights
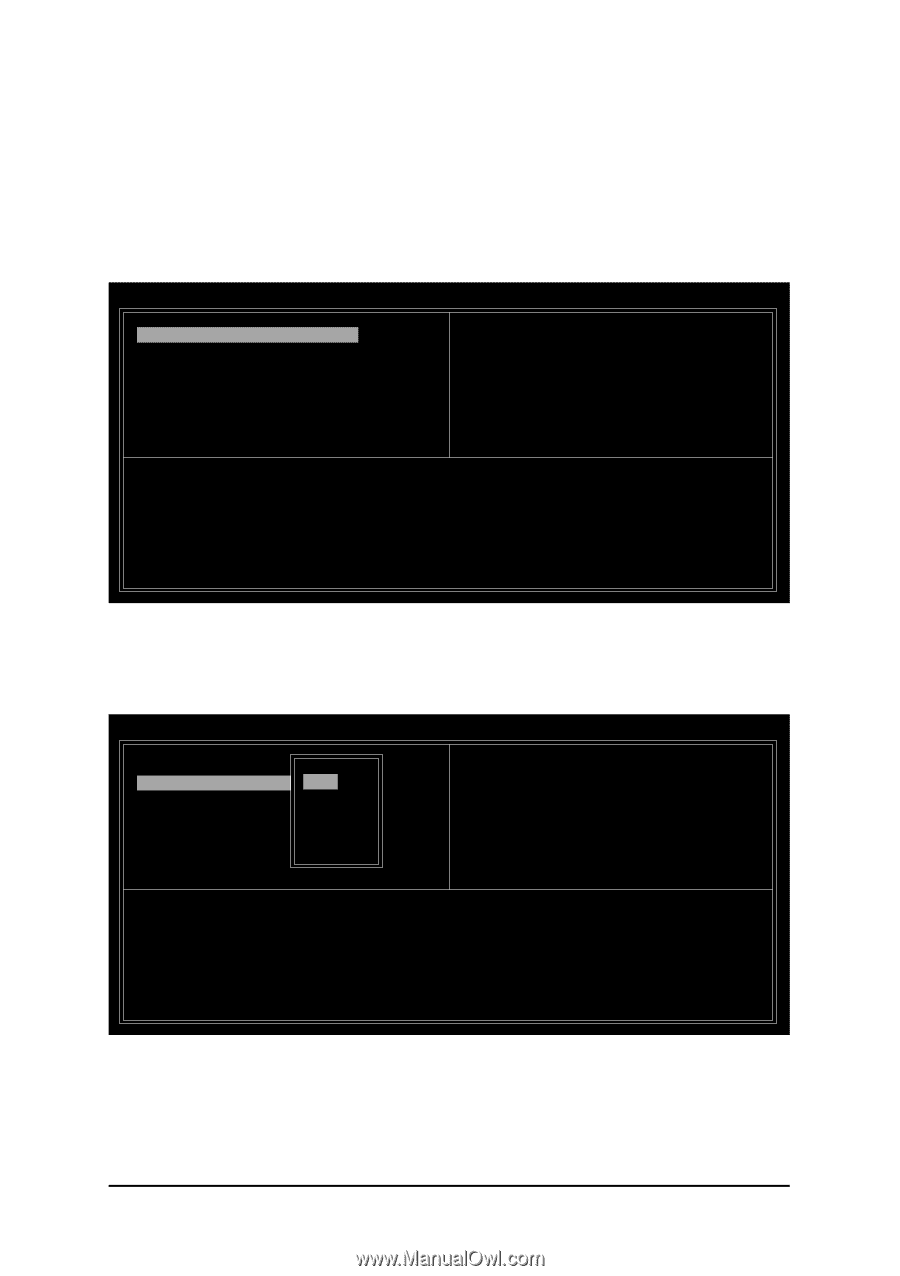
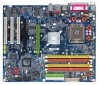
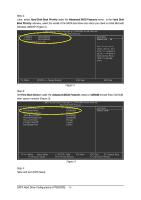
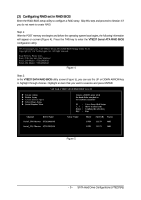
After selecting a RAID mode, you must decide whether you want the RAID array to be configured automatically or manually. Auto Setup allows BIOS to assign the hard drives and create arrays automatically, but it does not duplicate the mirroring drives even if user selects Create and duplicate for RAID 1. It is recommended all hard drives are new ones when you want to create an array. Select Disk Drives lets users select the array drives by their requirements. Select the Select Disk Drives item and press ENTER, use the ARROW keys to select the target hard drive(s). The selected hard drives will be marked with an asterisk (Figure 8). VIA Tech. VT8237 SATA RAID BIOS Ver 2.31 u Auto Setup For Performance u Array Mode RAID 0 (Striping) u Select Disk Drives u Block Size 64K u Start Create Process Create a RAID array with the hard disks attached to VIA RAID controller F1 : h, i : Enter : ESC : View Array/disk Status Move to next item Confirm the selection Exit Channel Drive Name [*]Serial_Ch0 Master ST3120026AS [*]Serial_Ch1 Master ST3120026AS Array Name Mode SATA SATA Size(GB) Status 111.79 Stripe0 111.79 Stripe1 Figure 8 If you select to create RAID 0 array manually, you can specify the block size. Use the UP or DOWN ARROW keys to select Block Size and press ENTER. Select the block size from the popup menu. The block size can be set between 4KB to 64KB (Figure 9). VIA Tech. VT8237 SATA RAID BIOS Ver 2.31 u Auto Setup For Performance u Array Mode RAID 0 (Stri4pKing) u Select Disk Drives 8K u Block Size 64K 16K u Start Create Process 32K 64K Create a RAID array with the hard disks attached to VIA RAID controller F1 : h, i : Enter : ESC : View Array/disk Status Move to next item Confirm the selection Exit Channel Drive Name [*]Serial_Ch0 Master ST3120026AS [*]Serial_Ch1 Master ST3120026AS Array Name Mode SATA SATA Size(GB) Status 111.79 Stripe0 111.79 Stripe1 Figure 9 Next, use the ARROW keys to select Start Create Process and press ENTER. The prompt "The data on the selected disks will be destroied. Continue? (Y/N)" will appear. Press Y to confirm or N to abort. Important All existing contents in the hard drive will be destroyed after the array creation. - 7 - SATA Hard Drive Configurations (VT8237(R))
-
 1
1 -
 2
2 -
 3
3 -
 4
4 -
 5
5 -
 6
6 -
 7
7 -
 8
8 -
 9
9 -
 10
10 -
 11
11 -
 12
12 -
13
-
14
 |
 |