Gigabyte GA-F2A68HM-DS2H User Manual - Page 31
C-2. Configuring Legacy RAID ROM
 |
View all Gigabyte GA-F2A68HM-DS2H manuals
Add to My Manuals
Save this manual to your list of manuals |
Page 31 highlights
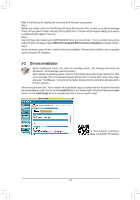
Steps: In BIOS Setup, go to BIOS Features and set Windows 8 Features to Windows 8 and CSM Support to Never. Save the changes and exit BIOS Setup. Running the UEFI RAID Utility Restart your computer and press to enter the boot device configuration menu. Use the up or down arrow key to select your USB flash drive which is prefixed with "UEFI:" string. Then press to access the screen as shown in Figure 3. To run the UEFI RAID utility, enter the following commands. You can enter the commands at Shell or fsx: level (x represents the disk number for your USB flash drive). Checking Disk Information To see the hard drive information, enter the following commands and press . You will see CONTROLLER LIST and DISK LIST displayed on the screen. rcadm -M -qa Creating a RAID Array To create a RAID array, refer to the following examples to enter the commands and press . When succeeded, the message which says "created successfully" will appear. Example 1: Create a RAID 0 array with Drive 0 and Drive 1 and the array size is 40 GB. rcadm -C -r0 -d 0 1 -s 40000 ("C"=Create a array, "r0"=RAID 0, d 0 1=Drive 0 and Drive 1, "s 40000"=Size of 40 GB; to use the maximum size allowed, do not enter "s x0000") Example 2: Create a RAID 5 array with Drive 1~4 and the array size is 75 GB. rcadm -C -r5 -d 1 2 3 4 -s 75000 ("C"=Create a array, "r5"=RAID 5, d 1 2 3 4=Drive 1~4, "s 75000"=Size of 75 GB) After you create the array, you can enter the "rcadm -M -qa" commands to see the array information. In addition to the CONTROLLER LIST and DISK LIST information, you will see ARRAY LIST information displayed on the screen, too. Deleting an Array To delete an array, enter the following commands and press . rcadm -D -a 1 ("D"=Delete a array, "a 1"=Array 1, to delete all arrays, enter "a *") When prompted to confirm, enter YES to delete or NO to cancel, and then press . To exit the UEFI RAID utility, enter "exit" and press . C-2. Configuring Legacy RAID ROM Enter the legacy RAID BIOS setup utility to configure a RAID array. Skip this step and proceed with the installation of Windows operating system for a non-RAID configuration. Steps: After the POST memory test begins and before the operating system boot begins, look for a message which says "Press to enter RAID Option ROM Utility". Press + to enter the RAID BIOS setup utility. Creating a RAID Array 1. To create a new array, press on the Create Array option. 2. The selection bar will move to the Disks section on the right of the screen. Select the hard drives to be included in the RAID array. Use the up or down arrow key to select a hard drive and press . The selected hard drive will be shown in green. To use all of the hard drives, simply press to select all. Then press and the selection bar will move to the User Input section on the left bottom of the screen. (Figure 10) Deleting an existing disk array could result in loss of data. Record all array information including the array type, the disk members, and stripe block size in case you wish to undo a deletion. - 31 -
-
 1
1 -
2
-
3
-
4
-
5
-
6
-
7
-
8
-
9
-
10
-
11
-
12
-
13
-
14
-
15
-
16
-
17
-
18
-
19
-
20
-
21
-
22
-
23
-
24
-
25
-
 26
26 -
 27
27 -
 28
28 -
 29
29 -
 30
30 -
 31
31 -
 32
32 -
 33
33 -
 34
34 -
 35
35 -
 36
36
 |
 |
