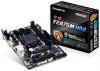
Gigabyte GA-F2A75M-HD2 User Manual - Page 30
C-2. Configuring Legacy RAID ROM, UEFI: Built-in EFI Shell, LD View/LD Define Menu, LD Define Menu
 |
View all Gigabyte GA-F2A75M-HD2 manuals
Add to My Manuals
Save this manual to your list of manuals |
Page 30 highlights
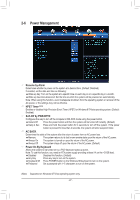
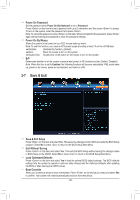
Step 2: Restart your computer and press to enter the boot device configuration menu. Use the up or down arrow key to select UEFI: Built-in EFI Shell. Press to access. Follow the steps below and enter the commands to access the RAID setup utility. 1. Enter drvcfg at Shell and press : Shell> drvcfg 2. When Drv [XX] Ctrl [XX] Lang [eng] appears, enter the following commands at Shell again: Shell> drvcfg -s XX XX XXs are the values shown in the brackets after Drv and Ctrl above, which may vary by hard drives. Then press to enter the RAID setup utility. Step 3: The Main Menu is the first screen when you enter the BIOS RAID Setup utility. Use the up or down arrow key to select Logical Drive Main Menu and press . Step 4: To create an array, press on Logical Drive Create Menu. Step 5: Usable hard drives are listed on the Logical Drive Create Menu. Use the up or down arrow key to select the hard drive to be included in the array and press the key. The selected hard drives will be marked with [X]. Then move to Basic Setting and press . Step 6: Use the up or down arrow key to move to and configure each required item in sequence. After completing, press on Start To Create. When the message "Are You Sure To Create Logical Drive?" appears, press to begin creating the RAID array or to cancel. When completed, a message which says "Successful To Create Logical Drive" will appear. Press to complete. Press to exit the RAID setup utility. Delete an Array To delete an array, select Logical Drive Delete Menu on the Logical Drive Main Menu and press to access. Then press on Start To Delete. When the message "Are You Sure To Delete Logical Drive?" appears, press to delete or to cancel. C-2. Configuring Legacy RAID ROM Enter the RAID BIOS setup utility to configure a RAID array. After the POST memory test begins and before the operating system boot begins, look for a message which says "Press to enter RAID Option ROM Utility". Press + to enter the RAID BIOS setup utility. The Main Menu is the first screen when you enter the BIOS RAID Setup utility. To create a new array, press to enter the LD View/LD Define Menu window. To create an array, press + to access the LD Define Menu. In the LD Define Menu, use the up or down arrow key to move to an item for further configuration. In the following procedure, we'll create RAID 0 as an example. Steps: 1. Under the RAID Mode section, press the key to select RAID 0. 2. Set the Stripe Block size. 64 KB is the default. 3. Under the Drives Assignments section, press the up or down arrow key to highlight a drive. 4. Press the key or to change the Assignment option to Y. This action adds the drive to the disk array. The Total Drv section will show the number of disks assigned. 5. Press + keys to save the information. Press + to input the array name. If you do not input the array name, the default array name will be used. - 30 -
-
 1
1 -
2
-
3
-
4
-
5
-
6
-
7
-
8
-
9
-
10
-
11
-
12
-
13
-
14
-
15
-
16
-
17
-
18
-
19
-
20
-
21
-
22
-
23
-
24
-
 25
25 -
 26
26 -
 27
27 -
 28
28 -
 29
29 -
 30
30 -
 31
31 -
 32
32 -
 33
33 -
 34
34 -
 35
35 -
36
 |
 |
