Gigabyte GA-Z270N-WIFI Users Manual - Page 11
Installing an Expansion Card, 1-6 Back Panel Connectors, PS/2 Keyboard/Mouse Port
 |
View all Gigabyte GA-Z270N-WIFI manuals
Add to My Manuals
Save this manual to your list of manuals |
Page 11 highlights
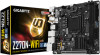
Due to CPU limitations, read the following guidelines before installing the memory in Dual Channel mode. 1. Dual Channel mode cannot be enabled if only one memory module is installed. 2. When enabling Dual Channel mode with two memory modules, it is recommended that memory of the same capacity, brand, speed, and chips be used. 1-5 Installing an Expansion Card Read the following guidelines before you begin to install an expansion card: •• Make sure the motherboard supports the expansion card. Carefully read the manual that came with your expansion card. •• Always turn off the computer and unplug the power cord from the power outlet before installing an expansion card to prevent hardware damage. 1-6 Back Panel Connectors PS/2 Keyboard/Mouse Port Use this port to connect a PS/2 mouse or keyboard. USB 3.1 Gen 1 Port The USB 3.1 Gen 1 port supports the USB 3.1 Gen 1 specification and is compatible to the USB 2.0 specification. Use this port for USB devices. SMA Antenna Connectors (2T2R) Use this connector to connect an antenna. Tighten the antenna cables to the antenna connectors and then move the antenna to a place where the signal is good. DVI-D Port (Note) The DVI-D port conforms to the DVI-D specification and supports a maximum resolution of 1920x1200@60 Hz (the actual resolutions supported depend on the monitor being used). Connect a monitor that supports DVI-D connection to this port. HDMI Port The HDMI port is HDCP compliant and supports Dolby TrueHD and DTS HD Master Audio formats. It also supports up to 192KHz/16bit 8-channel LPCM audio output. You can use this port to connect your HDMI-supported monitor. The maximum supported resolution is 4096x2160@24 Hz, but the actual resolutions supported are dependent on the monitor being used. •• After installing the HDMI device, make sure to set the default sound playback device to HDMI. •• To set up a triple-display configuration, you must install motherboard drivers in the operating system first. RJ-45 LAN Port The Gigabit Ethernet LAN port provides Internet connection at up to 1 Gbps data rate. The following describes the states of the LAN port LEDs. Connection/ Speed LED Activity LED Connection/Speed LED: State Description Activity LED: State Description Orange 1 Gbps data rate Blinking Data transmission or receiving is occurring Green 100 Mbps data rate On No data transmission or receiving is occurring LAN Port Off 10 Mbps data rate (Note) The DVI-D port does not support D-Sub connection by adapter. - 11 -
-
 1
1 -
2
-
3
-
4
-
5
-
 6
6 -
 7
7 -
 8
8 -
 9
9 -
 10
10 -
 11
11 -
 12
12 -
 13
13 -
 14
14 -
 15
15 -
 16
16 -
17
-
18
-
19
-
20
-
21
-
22
-
23
-
24
-
25
-
26
-
27
-
28
-
29
-
30
-
31
-
32
-
33
-
34
-
35
-
36
-
37
-
38
-
39
-
40
-
41
-
42
-
43
-
44
-
45
-
46
-
47
-
48
 |
 |
