Gigabyte GS-R1161-RH Manual
Gigabyte GS-R1161-RH Manual
 |
View all Gigabyte GS-R1161-RH manuals
Add to My Manuals
Save this manual to your list of manuals |
Gigabyte GS-R1161-RH manual content summary:
- Gigabyte GS-R1161-RH | Manual - Page 1
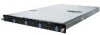
GS-R1161-RH 1U Rack Mount Server System Installation Guide Intel® Xeon LGA775 Processor Serverboard Rev. 1.0 - Gigabyte GS-R1161-RH | Manual - Page 2
GS-R1161-RH Rack Mount Server Table of Content Safety, Care and Regulatory Information 4 Introduction 8 Contents Packages 8 Chapter 1 Features Summary 16 Step 2-7: FAN Duct Removal and Installation 17 Chapter 4 Motherboard Jumper Setting 18 4-1: GA-5YXS2-RH Motherboard Jumpper Setting 18 2 - Gigabyte GS-R1161-RH | Manual - Page 3
Table of Content 3 - Gigabyte GS-R1161-RH | Manual - Page 4
GS-R1161-RH Rack Mount Server Safety, Care and Regulatory Information / Important safety information Read and follow all instructions marked on the product and in the documentation before you operate your system. Retain all safety and operating instructions Only authorized service technicians should - Gigabyte GS-R1161-RH | Manual - Page 5
and, if not installed and used in accordance with the instruction manual, may cause harmful interference to radio communications. Operation of causes harm to the telephone network, the Telephone Company may discontinue your service temporarily. If possible, they will notify in advance. But, if - Gigabyte GS-R1161-RH | Manual - Page 6
GS-R1161-RH Rack Mount Server Your telephone company may make changes in its facilities, equipment, operations, or procedures that could affect proper operation of your equipment. If they do, you will be notified in advance to give you an opportunity to maintain uninterrupted telephone service. The - Gigabyte GS-R1161-RH | Manual - Page 7
if battery is incorrectly replaced. ™ Replace only with the same or equivalent type recommended by the manufacturer. ™ Dispose of used batteries according to the manufacturer's instructions. 7 - Gigabyte GS-R1161-RH | Manual - Page 8
GS-R1161-RH Rack Mount Server Introduction Welcome to Gigabyte GS-R1161-RH Rack mount Server System Installation Guide. The guide provides instructions for configuration hardware for the GS-R1161-RH your system. This installation guide will assist you in installing all the essential components for - Gigabyte GS-R1161-RH | Manual - Page 9
Memory Mass Storage System Super I/O Controller Built-in I/O System BIOS: BIOS Type y GA-5YXS2-RH y Supports single Intel® Xeon® processor y Intel Xeon® Dual-Core/Quad-Core processor in LGA 775 socket y Supports 800/1066/1333MHz FSB y Intel® 3200 Chipset y Intel® ICH9R y 4 x DDR2 DIMM sockets up to - Gigabyte GS-R1161-RH | Manual - Page 10
GS-R1161-RH Rack Mount Server Server Management Functions: (Optional device) BMC Chip y H8S IPMI 2.0 controller Failure Detection y IPMI 2.0 specification of Server management Event Logging y 32KB Nonvolatile Memory - Gigabyte GS-R1161-RH | Manual - Page 11
Hardware Installation Process Chapter 2 System Hardware Installation Please observe the safety information in chapter "Important Safety Information" Do not expose the server to extreme environmental conditions. Protect it from dust, humidity, and heat. Step 2-1: Chassis Removal and Installation Step - Gigabyte GS-R1161-RH | Manual - Page 12
GS-R1161-RH Rack Mount Server Step 2-2: CPU Installation Please make sure the CPU type and speed that are supported by the motherboard. Step 1 Raise the metal locking lever on the socket. Insert the CPU with the correct orientation. Step 2 The CPU only fits in - Gigabyte GS-R1161-RH | Manual - Page 13
Step 2-3: Heat Sink Installation Hardware Installation Process Step 1 Place the Heat Sink on the CPU. Before putting the heat sink on the CPU, please well remember to apply the thermal conductivity compound on the CPU. Step 2 Seat the heat sink in the retention modules with the four screws. - Gigabyte GS-R1161-RH | Manual - Page 14
GS-R1161-RH Rack Mount Server Step 2-4: Memory Installation Step 1. Insert the DIMM memory module vertically into the DIMM slot, and push it down. Step 2. Close the plastic - Gigabyte GS-R1161-RH | Manual - Page 15
Mount Server Step 2-5: PCI Expansion Card Installation GS-R1161-RH provides expansion riser slots for one PCI-E , then pull it out from the server chassis. Step 3 Align the expansion card with the guiding groove. Slide the expansion card into the slot until the card firmly seats. Step 4 Align - Gigabyte GS-R1161-RH | Manual - Page 16
Hardware Installation Process Step 2-6: Hard Disk Drive Installation Step 1 Press the release button. Step 2 Pull the blank out of the drive bay. Step 3 Slide hard disk into blank. Step 4 Secure it with screws. Step 5 Slide the blank into the bay until it locks into place. Connect cable and power. 1 - Gigabyte GS-R1161-RH | Manual - Page 17
Hardware Installation Process Step 2-7: FAN Duct Removal and Installation Step 1 Align the fan duct with the guiding groove. Push down the fan duct into system ntil the its firmly seats. Guiding groove 17 - Gigabyte GS-R1161-RH | Manual - Page 18
Motherboard Layout Chapter 4 Motherboard Jumper Setting 4-1: GA-5YXS2-RH Motherboard Jumpper Setting RECOVERY1 CLR_CMOS1 18 - Gigabyte GS-R1161-RH | Manual - Page 19
GS-R1161-RH Rack Mount Server 1. CLR_CMOS ( (Clear CMOS jumper) You may clear the CMOS data to its default values by this jumper. Default value doesn't include the "
-
 1
1 -
 2
2 -
 3
3 -
 4
4 -
 5
5 -
 6
6 -
 7
7 -
8
-
9
-
10
-
11
-
12
-
13
-
14
-
15
-
16
-
17
-
18
-
19
 |
 |

System Installation Guide
GS-R1161-RH
1U Rack Mount Server
Intel
®
Xeon LGA775
Processor Serverboard
Rev. 1.0