Gigabyte GS-R1161-RH Manual - Page 15
Step 2-5: PCI Expansion Card Installation
 |
View all Gigabyte GS-R1161-RH manuals
Add to My Manuals
Save this manual to your list of manuals |
Page 15 highlights
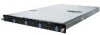
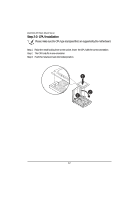
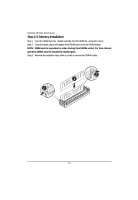
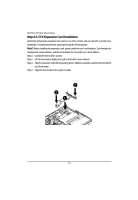
GS-R1161-RH Rack Mount Server Step 2-5: PCI Expansion Card Installation GS-R1161-RH provides expansion riser slots for one PCI-E x8 slot; and one with PCI-E x8 slot (at x1 bandwidth). To install the peripheral, please go through the following steps. Note!! Before installing the expansion card, please check the card size limitation. Size limitation for standard riser card is 182mm; and the size limitation for low profile riser card is 182mm. Step 1 Loosen the riser bracket screws. Step 2 Lift the riser bracket slightly, then pull it out from the server chassis. Step 3 Align the expansion card with the guiding groove. Slide the expansion card into the slot until the card firmly seats. Step 4 Align the riser bracket to the system module. 2 2 1 15
-
 1
1 -
2
-
3
-
4
-
5
-
6
-
7
-
8
-
9
-
 10
10 -
 11
11 -
 12
12 -
 13
13 -
 14
14 -
 15
15 -
 16
16 -
 17
17 -
 18
18 -
 19
19
 |
 |