Gigabyte P2532F Manual - Page 4
Your GIGABYTE Notebook Tour - bios
 |
View all Gigabyte P2532F manuals
Add to My Manuals
Save this manual to your list of manuals |
Page 4 highlights
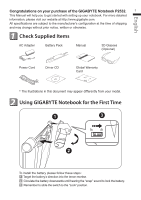
English 3 Your GIGABYTE Notebook Tour 3 Top View 12 1 Webcam 2 Microphone 3 Power Button 4 Smart+ Button 11 5 Volume Setting or Stereoscopic 10 - + 3 Depth Setting 9 4 6 LED Indicators 5 7 Battery Indicator Button 8 TouchPad 6 9 Num Lock & Caps Lock Indicator 10 Stereo speakers 87 11 IR Emitter Optional To call out smart manager function. Smart Setup- Under off condition, Push "Smart+" to enter "smart setup" menu in off mode. You can choose BIOS Setup Utility system recovery in the setup menu. Smart Manager- In Windows Mode Press "Smart +" button to initiate "Smart Manager". Optional, Stereoscopic Depth Setting for 3D model Use only Power Status LED Battery Status LED HDD Status LED Wireless Lan Status LED Bluetooth Status LED Left View 1 23 4 1 DC-in Jack 2 External Display (VGA) Port 3 eSATA/USB Combo 4 Optical Disc Drive
-
 1
1 -
 2
2 -
 3
3 -
 4
4 -
 5
5 -
 6
6 -
 7
7 -
 8
8 -
 9
9 -
 10
10 -
11
-
12
-
13
-
14
 |
 |
