Gigabyte P55-UD3L User Manual - Page 88
B. Installing Windows Vista, For the GIGABYTE SATA2, Load Driver, BootDrv, GSATA, Method
 |
View all Gigabyte P55-UD3L manuals
Add to My Manuals
Save this manual to your list of manuals |
Page 88 highlights
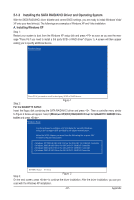
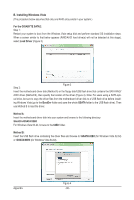
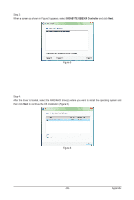
B. Installing Windows Vista (The procedure below assumes that only one RAID array exists in your system.) For the GIGABYTE SATA2: Step 1: Restart your system to boot from the Windows Vista setup disk and perform standard OS installation steps. When a screen similar to that below appears (RAID/AHCI hard drive(s) will not be detected at this stage), select Load Driver (Figure 3). Step 2: Figure 3 Insert the motherboard driver disk (Method A) or the floppy disk/USB flash drive that contains the SATA RAID/ AHCI driver (Method B), then specify the location of the driver (Figure 4). Note: For users using a SATA opti- cal drive, be sure to copy the driver files from the motherboard driver disk to a USB flash drive before install- ing Windows Vista (go to the BootDrv folder and save the whole GSATA folder to the USB flash drive). Then use Method B to load the driver. Method A: Insert the motherboard driver disk into your system and browse to the following directory: \BootDrv\GSATA\32Bit For Windows Vista 64-bit, browse to the 64Bit folder. Method B: Insert the USB flash drive containing the driver files and browse to \GSATA\32Bit (for Windows Vista 32-bit) or \GSATA\64Bit (for Windows Vista 64-bit). Appendix Figure 4 - 88 -
-
 1
1 -
2
-
3
-
4
-
5
-
6
-
7
-
8
-
9
-
10
-
11
-
12
-
13
-
14
-
15
-
16
-
17
-
18
-
19
-
20
-
21
-
22
-
23
-
24
-
25
-
26
-
27
-
28
-
29
-
30
-
31
-
32
-
33
-
34
-
35
-
36
-
37
-
38
-
39
-
40
-
41
-
42
-
43
-
44
-
45
-
46
-
47
-
48
-
49
-
50
-
51
-
52
-
53
-
54
-
55
-
56
-
57
-
58
-
59
-
60
-
61
-
62
-
63
-
64
-
65
-
66
-
67
-
68
-
69
-
70
-
71
-
72
-
73
-
74
-
75
-
76
-
77
-
78
-
79
-
80
-
81
-
82
-
 83
83 -
 84
84 -
 85
85 -
 86
86 -
 87
87 -
 88
88 -
 89
89 -
 90
90 -
 91
91 -
 92
92 -
 93
93 -
94
-
95
-
96
-
97
-
98
-
99
-
100
-
101
-
102
-
103
-
104
-
105
-
106
-
107
-
108
-
109
-
110
-
111
-
112
 |
 |
