Gigabyte T1132N Manual
Gigabyte T1132N Manual
 |
View all Gigabyte T1132N manuals
Add to My Manuals
Save this manual to your list of manuals |
Gigabyte T1132N manual content summary:
- Gigabyte T1132N | Manual - Page 1
English Congratulations on your purchase of the GIGABYTE Notebook. 1 This Manual will help you to get started with setting up your notebook. For more detailed information, please visit our website at http://www.gigabyte.com. All specifications are subject to the manufacturer's configuration at - Gigabyte T1132N | Manual - Page 2
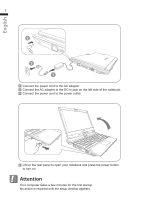
and press the power button to turn on. ! Attention Your computer takes a few minutes for the first startup. No action is required until the setup window appears. - Gigabyte T1132N | Manual - Page 3
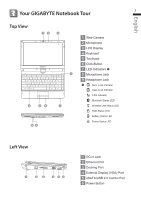
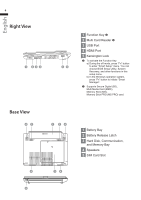
English 3 Your GIGABYTE Notebook Tour 3 Top View 12 3 1 Web Camera 2 Microphone 3 LCD Display 4 Keyboard 5 Touchpad 6 Click Button 7 LED Indicators 7 8 Microphone Jack 9 Headphone Jack Num. Lock Indicator Caps Lock - Gigabyte T1132N | Manual - Page 4
" menu. You can choose BIOS Setup Utility, System Recovery, and other functions in this setup menu. b) In the Windows operation system, press "Fn" button to initiate "Smart Manager". Supports Secure Digital (SD), Multi Media Card (MMC), Memory Stick (MS), Memory Stick PRO (MS PRO) card. Base View - Gigabyte T1132N | Manual - Page 5
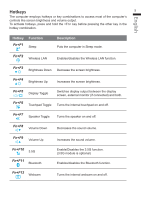
English Hotkeys 5 The computer employs hotkeys or key combinations to access most of the computer's controls like screen brightness and volume output. To activate hotkeys, press and hold the key before pressing the other key in the hotkey combination. Hotkey Fn+F1 Function Sleep - Gigabyte T1132N | Manual - Page 6
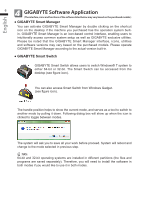
icons, utilities and software versions may vary based on the purchased models. Please operate GIGABYTE Smart Manager according to the actual version built-in. ● GIGABYTE Smart Switch GIGABYTE Smart Switch allows users to switch Windows® 7 system to either 64-bit or 32-bit. The Smart Switch can be - Gigabyte T1132N | Manual - Page 7
to its factory defaults in "Advanced Option" (select from the sub-menu after pressing "Advanced Option"). 4. Press "Exit" to quit from Smart Recovery. ● GIGABYTE Smart Setup During the off mode, press SMART button to enter "Smart Setup" menu. You can choose BIOS Setup Utility, System Recovery, and - Gigabyte T1132N | Manual - Page 8
depends on the users' bought. ■ Warranty & Service Warranty and service and related information please refer to the warranty card or GIGABYTE service website as the below link: http://www.gigabyte.com/support-downloads/technical-support.aspx ■ FAQ FAQ (Frequent Asked Questions) please
-
 1
1 -
 2
2 -
 3
3 -
 4
4 -
 5
5 -
 6
6 -
 7
7 -
8
 |
 |
Manual
Global Warranty Card
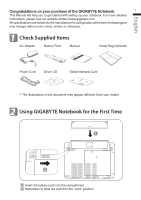
Congratulations on your purchase of the GIGABYTE Notebook.
This Manual will help you to get started with setting up your notebook. For more detailed
information, please visit our website at http://www.gigabyte.com.
All specifications are subject to the manufacturer's configuration at the time of shippingand
may change without prior notice, written or otherwise.
Using GIGABYTE Notebook for the First Time
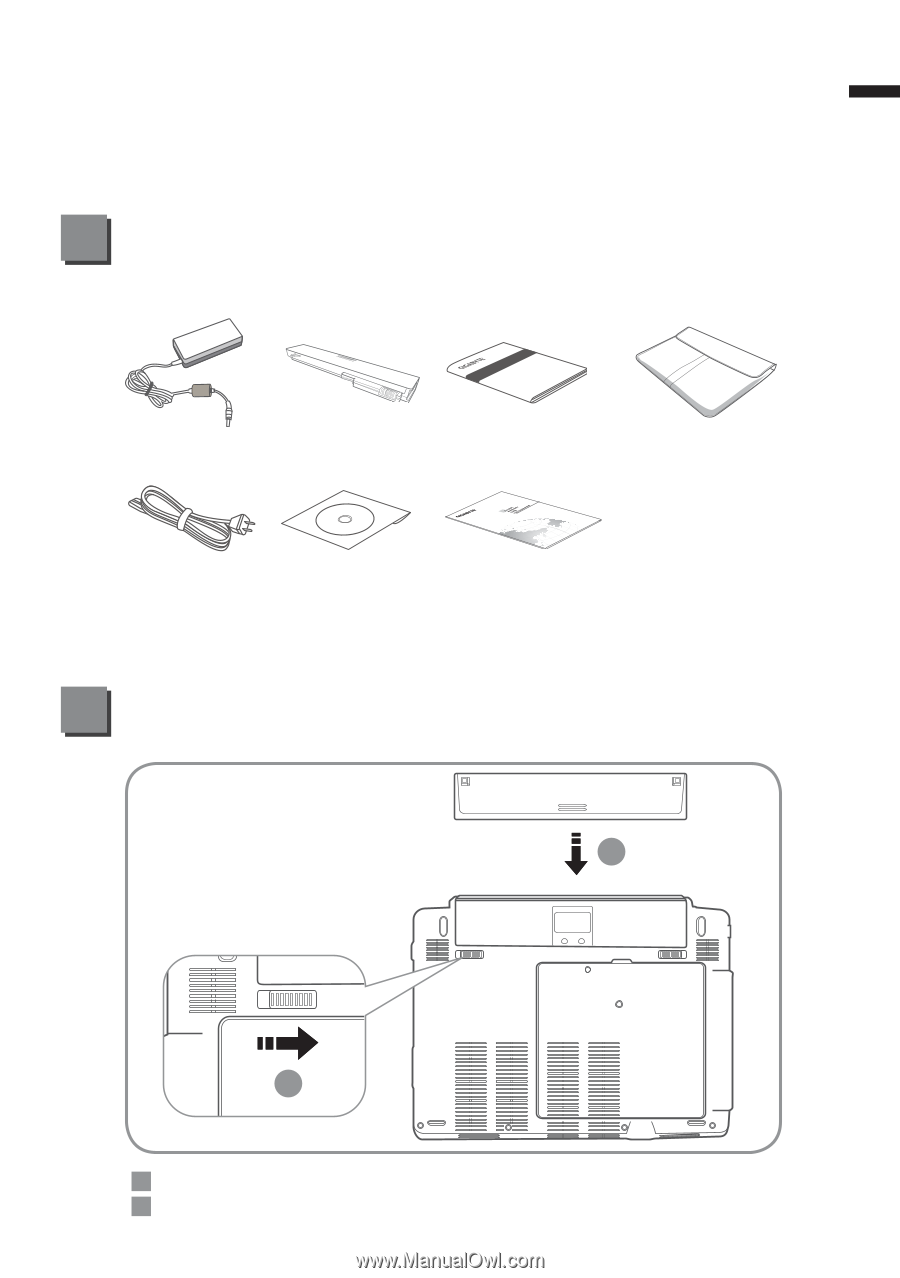
Check Supplied Items
1
2
AC Adapter
Power Cord
Battery Pack
Driver CD
Handy Bag (Optional)
* The illustrations in this document may appear different from your model.
Insert the battery pack into the compartment.
Remember to slide the switch to the “Lock” position.
1
2
English
1
1
2