Gigabyte Z790 AORUS ELITE X User Manual - Page 26
M2P_SB and M2M_SB connectors., M.2 PCIe x2 SSD
 |
View all Gigabyte Z790 AORUS ELITE X manuals
Add to My Manuals
Save this manual to your list of manuals |
Page 26 highlights
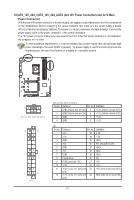
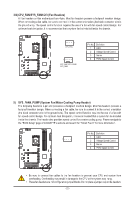
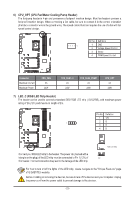
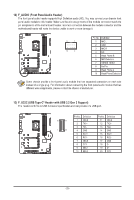
Follow the steps below to correctly install an M.2 SSD in the M.2 connector. Step 1: Turn the M.2 EZ-Latch Click clip clockwise and remove the motherboard heatsink. Locate the proper mounting hole for the M.2 SSD to be installed and then install the M.2 EZ-Latch Plus clip firs (For the M2P_SB and M2M_SB connectors.) If you want install an M.2 SSD in the 110mm hole, remove the EZ-Latch Plus clip from the 80mm hole first. Step 2: Remove the protective film from the thermal pad (only the M2A_CPU connector has the thermal pad) on the M.2 connector. Insert the M.2 SSD into the M.2 connector at an angle. Step 3: Press down on the front end of the M.2 SSD and make sure the M.2 SSD is secured by the clip. Remove the protective film from the bottom of the motherboard heatsink, and finally, turn the M.2 EZ-Latch Click clip clockwise and then install the heatsink back in place. * Types of M.2 SSDs supported by each M.2 connector: M.2 PCIe x4 SSD M.2 PCIe x2 SSD M2A_CPU a a M2P_SB a a M2Q_SB a a M2M_SB a a M.2 SATA SSD r r r a - 26 -
-
 1
1 -
2
-
3
-
4
-
5
-
6
-
7
-
8
-
9
-
10
-
11
-
12
-
13
-
14
-
15
-
16
-
17
-
18
-
19
-
20
-
 21
21 -
 22
22 -
 23
23 -
 24
24 -
 25
25 -
 26
26 -
 27
27 -
 28
28 -
 29
29 -
 30
30 -
 31
31 -
32
-
33
-
34
-
35
-
36
-
37
-
38
-
39
-
40
-
41
-
42
-
43
 |
 |
