Graco 3543835 Assembly Instructions - Page 1
Graco 3543835 - Kimberly Armoire, Espresso Manual
 |
UPC - 654582353858
View all Graco 3543835 manuals
Add to My Manuals
Save this manual to your list of manuals |
Page 1 highlights
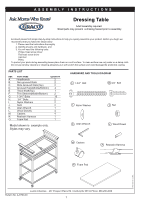
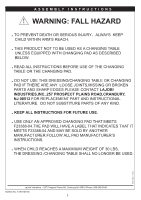
ASSEMBLY INSTRUCTIONS Dressing Table Adult assembly required. Small parts may present a choking hazard prior to assembly. Enclosed please find simple step-by-step instructions to help you quickly assemble your product. Before you begin we recommend that you follow the steps below: 1. Please read the instructions thoroughly 2. Identify all parts and hardware, and 3. You will need the following tools: Philips Head screw driver Flat head screw driver Hammer Pliers. To protect your parts during assembly please place them on a soft surface. To clean surface use only water on a damp cloth. Do not use window cleaners or cleaning abrasives as it will scratch the surface and could damage the protective coating. PARTS LIST REF. PART NAME QUANTITY A. Headboards 2 B. Non-grooved Rails 2 C. Wide Grooved Rails(Top) 2 D. Grooved Rails(Middle/Bottom) 4 E. Thick Shelf(Top) 1 F. Thin Shelves(Middle/Bottom) 2 G. 1-3/4 " Bolts 16 H. 3/4 " Bolts 2 I. Nylon Washers 2 J. Nuts 2 K. Allen Wrench 1 L. Wood Dowels 4 M. Casters 4 N. Restraint Harness 1 O. Foam Pad 1 Model shown is example only. Styles may vary. HARDWARE AND TOOLS DIAGRAM G 1-3/4" Bolt H 3/4" Bolt I Nylon Washer K Allen Wrench J Nut L Wood Dowel M Casters N Restraint Harness O Foam Pad PRINTED IN CHINA Bulletin No. A-DT00-00 LaJobi Industries. - 257 Prospect Plains Rd. Cranbury,NJ 08512-Phone: 888-266-2848 1
-
 1
1 -
 2
2 -
 3
3 -
 4
4 -
 5
5 -
 6
6 -
 7
7 -
8
 |
 |