Haier AC282AFERA User Manual - Page 18
Haier AC282AFERA Manual
 |
View all Haier AC282AFERA manuals
Add to My Manuals
Save this manual to your list of manuals |
Page 18 highlights
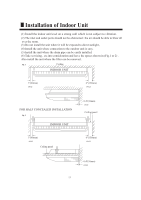
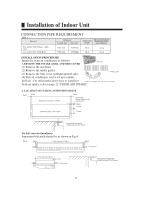
Installation of Indoor Unit Fig. 7 Ceiling Fig. 8 Ceiling panel Wall Wall (2) Fasten the indoor unit into place by tightening-up the special "B",blots and the M10 nuts. Make sure that unit is secure and willl not shift back and forth. FOR HALF-CONCESLED INSTALLATION When installing the indoor unit in a semi-concesled orientation, make sure to reinforce the insulation of the unit on all sides. Drops of water may fall from the unit if it is not thoroughly insulated. Fig. 9 Glass wool insulate (10 to 20mm thick ) INDOOR UNIT (Top view) Wall Ceiling pannel CAUTION In order to check the drainage, be sure to use a level during installation of the indoor unit. If the installation site of the indoor unit is not level, water leskage may occur 16
-
 1
1 -
2
-
3
-
4
-
5
-
6
-
7
-
8
-
9
-
10
-
11
-
12
-
 13
13 -
 14
14 -
 15
15 -
 16
16 -
 17
17 -
 18
18 -
 19
19 -
 20
20 -
 21
21 -
 22
22 -
 23
23 -
24
-
25
-
26
-
27
-
28
-
29
-
30
-
31
 |
 |

ԱźÙËÈÔÚÁ±ÂÁÄÍÈÄ̺¼ÂÍÆËÈÈËƼ±Â
¼¹º¸´Õ³´º¶¸ºÐÛ³Ð溶۳ºÕ´µ·¹µ×³ðºÞ³º½À´³º¶¸ºÀ½³ºµº¾³ã³¾ºÕÀ´·¹×º·¹½¶µ¾¾µ¶·¸¹º¸Îº¶Û³º·¹Õ¸¸´
À¹·¶àº¼Îº¶Û³º·¹½¶µ¾¾µ¶·¸¹º½·¶³º¸Îº¶Û³º·¹Õ¸¸´ºÀ¹·¶º·½º¹¸¶º¾³ã³¾ðºäµ¶³´º¾³½æµ×³ºÖµÏº¸ÐÐÀ´
ÁËáƼ±Â
¼¹½¶µ¾¾µ¶·¸¹º¸Îº¼¹Õ¸¸´ºá¹·
¹ÄÃÆÃÍѼÌÂÍÄÆ
³ÂÆÆ
ìľǴÅÇÀÿ½½ÅÇÌ´Ãľ´ÅDz²Á´ÉÇÅôÅÇ´¿´À¾ÈÅÞͲÇ;À½¾Â´²ÁžÇÿÃŲÇߴȿξ´ÀÉÁ¾´Ã²´Á¾ÅÇ˲Á;´Ãľ
ÅÇÀɽ¿ÃŲǴ²Ë´Ãľ´ÉÇÅô²Ç´¿½½´ÀžÀ³´çÁ²ÆÀ´²Ë´à¿Ã¾Á´È¿Ï´Ë¿½½´ËÁ²È´Ãľ´ÉÇÅôÅË´ÅôÅÀ´Ç²Ã
ÃIJÁ²ÉÌĽϴÅÇÀɽ¿Ã¾Â³
潿ÀÀ´à²²½´ÅÇÀɽ¿Ã¾
ñ¶µ´Ã²´ÒµÈÈ´ÃÄÅÍδò
ܱçÚÚشݱÜÛ
ñ۲ƴâžàò
쿽½
ѾŽÅÇÌ´Æ¿ÇǾ½
ñÒò´Ô¿ÀþǴÃľ´ÅDz²Á´ÉÇÅôÅÇò´Æ½¿Í¾´ÊÏ´ÃÅÌÄþÇÅÇÌÞÉÆ´Ãľ´ÀƾÍÅ¿½´ù»ùßʽ²ÃÀ´¿Ç´Ãľ´ë¶µ
ÇÉÃÀ³´ë¿Î¾´ÀÉÁ¾´ÃĿôÉÇÅôÅÀ´À¾ÍÉÁ¾´¿Ç´àŽ½½´Ç²Ã´ÀÄÅËôʿÍδ¿Ç´˲ÁÃij
³ÂÆÆ
¹ÄÃÆÃÍÑ
¶º
Ô·×àºñ
Ô·×àºò
Ô·×àºó