Haier ATB12ARW User Manual - Page 11
Refrigerator Features and Use
 |
View all Haier ATB12ARW manuals
Add to My Manuals
Save this manual to your list of manuals |
Page 11 highlights
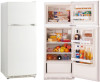
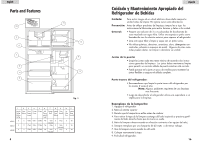
Español Para reemplazar un estante voladizo de ancho entero: (ver fig. 10) (HTV16 & HTE16) 1. Guie los ganchos en la parte trasera del estante y coloque en los orificios deseados de la guía de metal en la pared del refrigerador. 2. Levante el frente del estante para que los soportes traseros del estante se acomoden en su lugar. 3. Baje ahora el estante a la posición adecuada hasta que los soportes traben en su lugar. fig. 10 4. Para retirar levante gentilmente el estante, desenganche y retire. Cajon y cobertor: (series HTE solamente) Para retirar el cajón: (ver fig 11) 1. Deslice el cajón hacia delante hasta que llegue el borde 2. Agarre y tire del frente del cajón con una mano mientras que con la otra mano sostiene la parte inferior del mismo. Deslice gentilmente hacia fuera. fig. 11 Para retirar el estante o cobertor del cajón: 1. Retire primero el cajón de acuerdo a las instrucciones dadas anteriormente 2. Levante del estante hasta que los ganchos traseron se suelten de la guía de metal. 3. Tire del estante gentilmente hasta que salga completamente de su lugar. Para instalar el estante o cobertor del cajón: 1. Guie los ganchos soportes del estante a las ranuras deseadas de la guía de metal en la pared del refrigerador. 2. Levante el frente del estante para insertar los ganchos en en la ranura de la guía. 3. Bajar el frente del estante a la posición original hasta que los soportes se acomoden finalemente en la guía. 11 English Refrigerator Features and Use General Features Adjustable temperature dial: Your refrigerator will automatically maintain the temperature level you select. The temperature control dial has 7 settings plus off. 1 is the warmest. 7 is the coldest. Turning the dial to OFF stops cooling in both the refrigeration and freezer sections. At first, set the dial to 4 and allow 24 hours to pass before adjusting the temperature to your needs. Note: If the refrigerator has been placed in a horizontal or tilted position for any period of time wait 24 hours before plugging the unit in. Refrigerator Section Interior Light Your refrigerator is equipped with an interior light in the fresh food section for you to easily locate your food. It automatically goes on when the door opens. Freezer Temperature Control (see fig. 6) The temperature in the freezer compartment can be adjusted from low to high freeze. Factory setting is at normal. To make the freezer compartment cooler, shift the temperature control towards high freeze. This will lower the temperature in the freezer section only. fig. 6 Note: Be careful not to block the air vent. This will affect the air circulation of the freezer and refrigerator compartment. Refrigerator Interior Shelves (see fig. 7) The refrigerator shelves can be adjusted to suit your varying storage needs. To remove or adjust a full-width slide-out shelf: (see fig. 7) (HTV15 & HTE15) 1. Gently tilt the shelf up and slide forward until the shelf has been completely removed. 2. To replace the shelf, select the desired setting and gently slide the shelf back until it rests in the locking position. fig. 8 10
-
 1
1 -
2
-
3
-
4
-
5
-
 6
6 -
 7
7 -
 8
8 -
 9
9 -
 10
10 -
 11
11 -
 12
12 -
 13
13 -
 14
14 -
 15
15 -
 16
16 -
17
-
18
-
19
-
20
-
21
-
22
-
23
-
24
-
25
-
26
-
27
-
28
-
29
-
30
 |
 |
