Haier AU42NAIBEA User Manual - Page 10
Air discharging method
 |
View all Haier AU42NAIBEA manuals
Add to My Manuals
Save this manual to your list of manuals |
Page 10 highlights
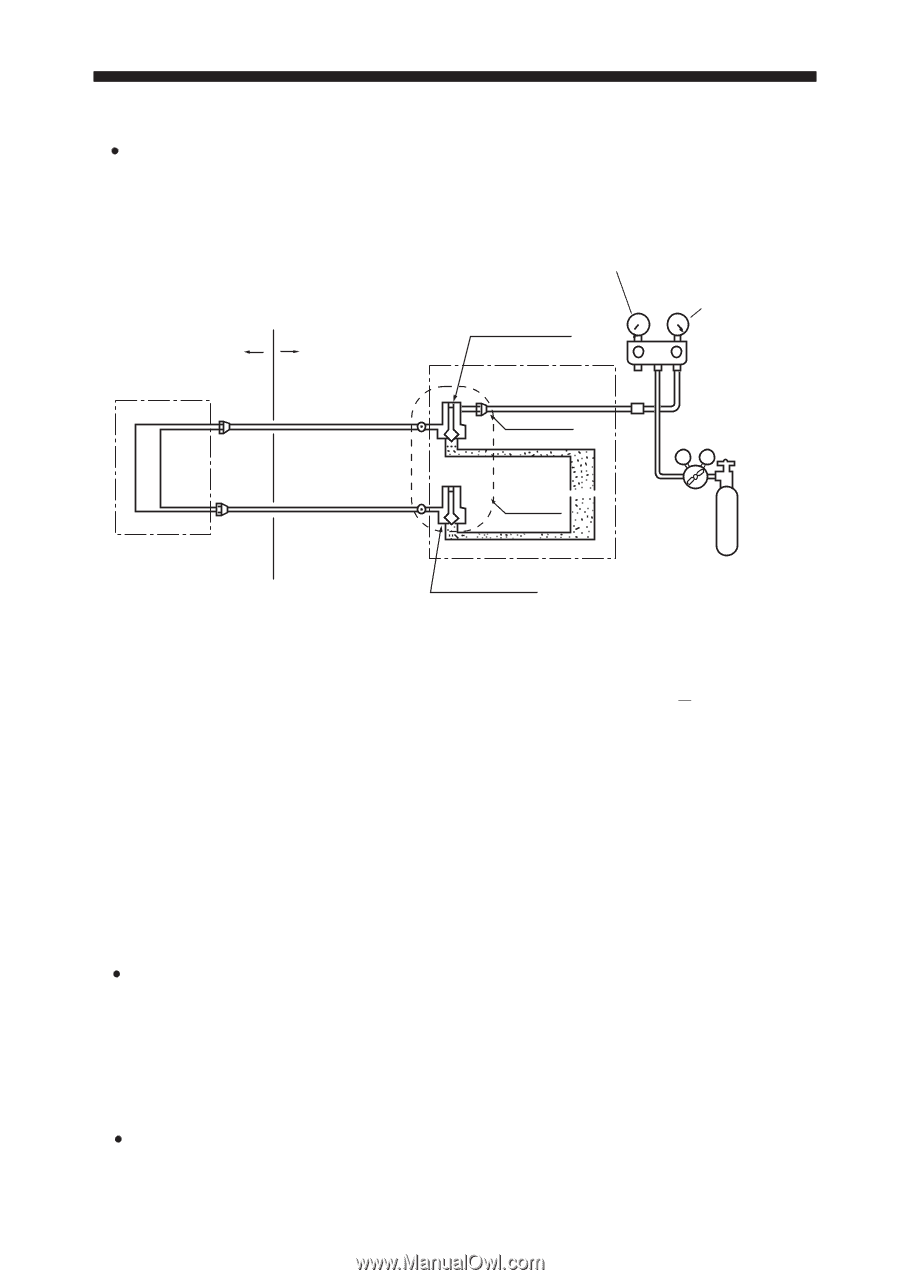
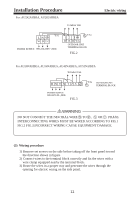
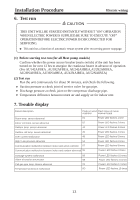
Installation Procedure Refrigerant piping 5. Air discharging method After finishing connection of refrigerant pipe, it shall perform air tightness test. The air tightness test adopts nitrogen tank to give pressure according to the pipe connection mode as the following figure shown. The gas and liquid valve are all in close state. In order to prevent the nitrogen entering the circulation system of outdoor unit, tighten the valve rod before giving pressure (both gas and liquid valve rods). Low pressure peizometer Indoor Outdoor High pressure peizometer 3-way valve totally closed (Gas side) VL VH Meter separator Completely tightened Flare part Discharging valve Completely tightened Indoor units Flare part Manhole Dropping valve Nitrogen tank Outdoor units 3-way valve totally closed (Liquid side) First step: 0.3MPa (3. 0kg/cm2g) pressurize over 3 minutes. Second step: 1.5Mpa (15kg/cm2g) pressurize over 3 minutes. Large leakage will be found. Third step: 3.0 MPa (30kg/cm2g) pressurize about 24 hours. Little leakage will be found. TUBING BRING BRAZED LINE PRESSURE GAUGE SWEAT JOINT LARGE SLIP-ON CONNECTOR SERVICE HOUSE CYLINDER PRESSURE GAUGE CYLINDER OF NITROGEN Check if the pressure drops The pressure does not drop-passed The pressure drops-check the leaking point. From pressurizing to 24 hours later, each 1* difference of ambient temperature will make 0.01MPa(0.1kg/cm2g) pressure change. It shall be corrected during test. Checking the leaking point In the first to third test steps, if the pressure drops, check the leakage in each joint use sense of hearing, feeling and soap water, etc. methods to find the leaking point. After confirming the leaking point, welding it again or tighten the nut tightly again. 9
-
 1
1 -
2
-
3
-
4
-
 5
5 -
 6
6 -
 7
7 -
 8
8 -
 9
9 -
 10
10 -
 11
11 -
 12
12 -
 13
13 -
 14
14
 |
 |