Haier BD-101G Use and Care Manual - Page 3
Haier BD-101G Manual
 |
View all Haier BD-101G manuals
Add to My Manuals
Save this manual to your list of manuals |
Page 3 highlights
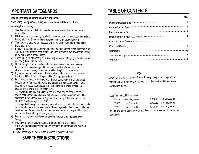
ENERGY-SAVING TIPS • Do not place your freezer next to a heating vent, a range or in direct sunlight. • Keep the door closed as much as possible, especially in hot, humid weather. • Defrost the freezer whenever frost becomes 11-inch thick. • Cover foods securely to reduce moisture buildup inside the freezer. FREEZER INSTALLATION The freezer is designed for free-standing installation only. It should not be recessed or built-in. Install the freezer on a base strong enough to support it when fully loaded. When moving the freezer, never tilt it at more than a 45 degree angle: this could damage the compressor and system. If the freezer is tilted over 45 degrees or stored on its side, allow the freezer to stand upright for at least 24 hours prior to plugging it back in to allow the refrigerant to settle. Install the freezer in a well-ventilated area, away from any heat source or direct sunlight. Air must circulate freely around the freezer. Allow at least 4" of clearance space for the top, back and sides. Make sure the freezer is on a stable surface to avoid noise and vibration. See insert for installing casters. ELECTRICAL CONNECTION Important - For personal safety, this appliance must be properly grounded. In the event of an electrical short circuit, grounding reduces the risk of electric shock by providing an escape wire for the electric current.This appliance is equipped with a cord having a grounding wire with a grounding plug.The plug must be plugged into an outlet that is properly installed and grounded. Consult a qualified electrician or service center if the grounding instructions are not completely understood, or if doubt exists as to whether the appliance is properly grounded. Do not, under any circumstances, cut or remove the third (ground) prong from the power cord. USE OF EXTENSION CORDS We strongly recommend against using extension cords because of potential safety hazards. If it is necessary to use an extension cord, use only a 3-wire extension cord that has a 3blade grounding plug and a 3-slot outlet that will accept the plug. The marked rating of the extension cord must be equal to or greater than the electrical rating of the appliance. DRAINING THE FREEZER (GLD ONLY) 1: Open the inner plug in the bottom of the freezer compartment. 2: Place a tray or other water recepticle beneath the outer drain dial/plug(front lower left of the freezer). 3: pull the drain dial out and rotate it until the triangle points downward. 4: When done, return the triangle to the up position, push the dial back in, and replace the plug inside the freezer compartment. 4 OPERATING YOUR FREEZER Once the freezer is properly plugged in, the green POWER light will come on, indicating the freezer is in operation. Temperature TEMPERATURE CONTROL DIAL Control Dial The temperature control dial has settings from OFF • is the warmest • "III" is the coldest Initially set the temperature control dial between II and III by turning the dial clockwise. Yellow•Quick-Freeze Switch Green-Power-On Light After 30 minutes, you should notice an obvious decrease in the freezer's interior temperature. Now place your food in the freezer, allowing some space between items to ensure proper air circulation.After using the freezer for 24 hours, adjust the temperature control to the setting that is best suited to your needs. If you unplug the freezer or experience an electrical outage, allow 5 minutes before plugging it back in. "QUICK-FREEZE" FEATURE The "Quick-Freeze" feature allows you to freeze foods quickly when initially turning on the freezer or when you have added a lot of food to the freezer at one time, Flip the yellow switch for quick-freeze and the compressor will run continuously. Turn the quickfreeze feature off once food has reached desired temperature. FOOD BASKET The freezer has a removable food basket for storing items at a higher level. If you do not wish to use the food basket, you can remove it or turn the handles in and move the basket to the bottom of the freezer. A solid tray is included to hold small items or items that may drip prior to freezing. Set the tray in the bottom of food basket or close to the top of basket on the wire rails on each end of basket. LOCK AND KEY (GLD models on(y) The freezer has a lid lock which allows you to secure freezer contents from theft or to simply keep children out of the freezer. To lock lid, close lid securely, insert key into lock and turn key until lid is latched and locked. To unlock, simply turn key in opposite direction and remove key. CARE AND CLEANING CLEANING THE EXTERIOR Wipe the outside of the freezer with a damp cloth and wipe dry. To clean the door gasket use only mild, soapy water. Never use harsh cleansers or scouring pads to clean any part of the freezer. CLEANING THE INTERIOR Unplug the freezer and remove food and basket. Wash the interior with a warm water and baking soda solution (about two tablespoons of baking soda to a quart of water). Rinse and dry. 5
-
 1
1 -
 2
2 -
 3
3 -
 4
4
 |
 |