Haier EI39G1MW G1M User Manual - Page 1
Haier EI39G1MW Manual
 |
View all Haier EI39G1MW manuals
Add to My Manuals
Save this manual to your list of manuals |
Page 1 highlights
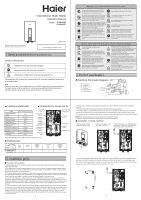
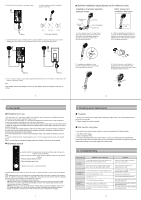
Instantaneous Water Heater Operation Manual ModelğEI39G1M(W) EI39G1M(S) Please read this manual carefully before use Please keep this manual properly for reference. 0040510390 V One dimensional code 60mm*10mm (please read before use) Symbol interpretation Indicates the act that must be forbidden Indicates the act that must be carried out Caution Indicates the matter which must be paid attention to Our company will not bear any responsibility for incorrect installation and use of this water heater! Note: Failure to follow this manual means the risk of accident, property loss and personal injury. The water heater must be repaired or maintained by qualified professional personnel. Improper operation may cause serious personal injury or property loss. 1 In case of any abnormality or scorching smell of the water heater, please cut off the power supply immediately and contact the service center. Do not touch the power supply with wet hands, so as to prevent it from getting wet by water. If it is wet by accident, it must be inspected and confirmed by the professional personnel appointed by our company before reuse to prevent electric shock. In order to ensure safety, the power supply of the water heater should be reliably earthed, otherwise, it is strictly prohibited to use the water heater. The test pencil should be used to determine whether the live wire and the neutral wire are connected reversely. Make sure to use an independent power supply̻ switch matched with the water heater must be used This appliance is not to be used for a potable water supply. diameters meet the rated current of the water Caution hot water This appliance is not intended for use by persons (including children) with reduced physical, sensory or mental capabilities, or lack of experience and knowledge, unless they have been given supervision or instruction concerning use of the appliance by a person responsible for their safety. Children should be supervised to ensure that they do not play with the appliance. Caution Product specification Electrical Schematic Diagram YELLOW &GREEN TB: Terminal Block ER: ELCB Ring RT2: Water-out Sensor FL: Flow Sensor MT: Thermal Cut-Out HE: Heating Element Display Board FL RT2 COM Control NO Board COM NO HE BLACK Triac Board BROWN BROWN MT YELLOW &GREEN YELLOW&GREEN BLUE BLUE N BLUE ER BROWN TB L 2 Technical parameter Introduction to components Model EI39G1M(W) EI39G1M(S) Rated power-Rated current W-A AC 240 V Rated Frequency Waterproof Grade Rated Pressure Maximum water-out temperature Minimum inlet pressure 3950-16.5 50 Hz IP25 0 MPa 50 oC 0.02MPa Maximum inlet pressure 0.6MPa Start flow Outline dimension Net weight 1.5L/min 360 mm*200 mm*85 mm 1.85kg Crimping board Temperature controller Heating element Stainless steel circlip Water-out temperature sensor Water-out pipe Note:The allowable error range of the net weight is ±10%. Terminal block Inductor coil Computer board Flow sensor Indicator board Water-in pipe 7. The test pencil should be used to determine whether the live wire and the neutral wire are connected reversely. 8. The outlet must not be connected to any tap or fitting other than those specified. 9. The water heater is equipped with the flow control valve. For use safety, the flow control valve should be installed on the water-in pipe, and it is strictly forbidden to install the valve at the outlet of the water heater. 10.The water inlet of this appliance shall not be connected to inlet water obtained from any other water heating system. 11.Metallic / chromed hose and conductive control valve shall not be used! Installation of whole machine 1.Remove the front shell screws and the front shell. 2.Remove the power cord plug of the rear shell. 3. Install the power cord corresponding to the live wire, neutral wire and earth wire respectively, and fix it by wire nail. heater (Set) Three-gear sprinkler (Set) EI39G1M(W) 1 1 1 1 EI39G1M(S) package (Set) 1 Installation guide Precautions for installation 1. The load-bearing wall for installing the water heater should be able to bear twice the weight of the water heater filled with water. 2. The water heater should be installed indoors and in a non-icing place, with pipes arranged centrally.The hot water outlet should not be too far away from the hot water use point. If the distance exceeds 2m,the hot water pipe should be insulated to reduce heat loss. 3. The water heater should be installed in a place that is convenient for use and maintenance and has a sewer to ensure that surrounding or lower facilities cannot be damaged when water heater or water pipe leaks. Please do not install the water heater in a place that can be sprayed directly or is prone to icing. 4. Because of the high power of this water heater, before installing the water heater, please carefully check whether the ammeter and power wire diameters (2.5mm2recommended) and fuse meet the rated current and voltage requirements of this water heater. If necessary, please ask a professional electrician to check the circuit. 5. Do not connect the water-in and water-out pipes reversely; Under no circumstances should the outlet be blocked. 6. To ensure safety, the water heater should use the standard single-phase bipolar air switch or circuit breaker (in the case of circuit breaking, the open distance of all contacts should be at least 3mm so as to reliably cut off the connection with the external power supply during maintenance), and be earthed reliably, with the earthing resistance of the household earth wire less than 4Ω. Because the water heater requires a large current,the incoming power supply of the water heater must be directly connected with the air switch, and the power plug should not be used. 3 319(mm) 4. Confirm the installation position of the water heater, and drill four φ6X35mm holes on the load-bearing wall with impact drill, with the spacing as shown in the figure below (it is also allowed to correspondingly locate the four fixing points by placing the rear shell on the wall). And then, drive four expansion bolts into four holes respectively, hang up the machine,and fix the machine with screws. 163̵ͺͺ̶ 4
-
 1
1 -
 2
2
 |
 |