Haier ESA424J User Manual - Page 8
Return chassis to the outer case
 |
View all Haier ESA424J manuals
Add to My Manuals
Save this manual to your list of manuals |
Page 8 highlights
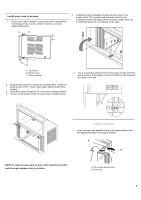
2. Place the window lock bracket as shown. Use a 1⁄8" drill bit to drill a starter hole through the hole in the window lock bracket and into the upper window. 3. Attach the window lock bracket to the upper window with one 31⁄32" screw to secure the window in place. Return chassis to the outer case Find someone to help you replace the chassis in outer case. Replace front panel and grille. 1. Plug into a grounded 3 prong outlet. 2. Press RESET on the power supply cord. See "Electrical Requirements." CAUTION: For security purposes, reinstall screws at cabinet's sides, removed in step one. IMPORTANT: Because the window sash helps keep the unit in window, make certain the window sash contacts the outer case before reinstalling the chassis. 8
-
 1
1 -
2
-
 3
3 -
 4
4 -
 5
5 -
 6
6 -
 7
7 -
 8
8 -
 9
9 -
 10
10 -
 11
11 -
 12
12 -
 13
13 -
14
-
15
-
16
-
17
-
18
-
19
-
20
-
21
-
22
-
23
-
24
-
25
-
26
-
27
-
28
-
29
-
30
-
31
-
32
-
33
-
34
-
35
-
36
-
37
-
38
-
39
-
40
-
41
-
42
-
43
-
44
 |
 |

1.
Plug into a grounded 3 prong outlet.
2.
Press RESET on the power supply cord. See “Electrical
Requirements.”
8
2.
Place the window lock bracket as shown. Use a
1⁄8
” drill bit to
drill a starter hole through the hole in the window lock bracket
and into the upper window.
3.
Attach the window lock bracket to the upper window with one
31⁄±2
” screw to secure the window in place.
Return chassis to the outer case
Find someone to help you replace the chassis in outer case.
Replace front panel and grille.
CAUTION:
For security purposes, reinstall screws at cabinet’s
sides, removed in step one.
IMPORTANT:
Because the window sash helps keep the unit in
window, make certain the window sash contacts the outer case
before reinstalling the chassis.