Haier HC60D1VAR User Manual - Page 11
Evacuation, Charging the System, WARNING, Do not vent refrigerant to the atmosphere, wear safety
 |
View all Haier HC60D1VAR manuals
Add to My Manuals
Save this manual to your list of manuals |
Page 11 highlights
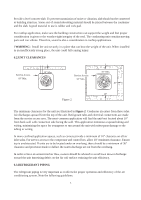
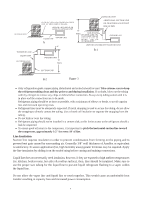
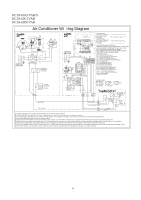
1.Tubing should be cut square. Make sure it is round and free of burrs at the connecting ends. Clean the tubing to prevent contamination from entering the system. 2.Make sure that both refrigerant stop valves at the outdoor unit are closed. 3.Push the tubing into the fitting until it stops. This prevents flux from getting into the system. 4.Remove the cap and Schrader valve core from the service port to protect the valve seals. 5.Wrap a wet rag around the valve stub before brazing. 6.Braze the joints of interconnecting tubing. Flow dry nitrogen into the shutoff valve port and through the tubing while brazing. 7.After brazing quench with a wet rag to cool the joint. Reinstall the Schrader core in the valve, if removed for brazing. 8.Pressurize the lines to 150 psi maximum with dry nitrogen. Check for leaks at all joints with liquid detergent. If a leak is found, repair it after removing the nitrogen. Repeat the process and re-ckeck. 9.Do not purge the lines with refrigerant. Evacuate the lines and indoor coil. Evacuation All new installations must be evacuated to a deep vacuum in order that all noncondensible gases and moisture are removed prior to charging the system. Air in a system causes high condensing pressure, which increases power consumption and reduces performance. The presence of moisture in a system can render it inoperable in a very short time. Proper evacuation assures a dry, uncontaminated system. Here is the recommended evacuation procedure: 1.Connect vacuum pump to both liquid and suction valve service ports. 2.Evacuate the interconnecting tubing and indoor coil to 500 microns or less for a minimum of 30 minutes. Close the valve to the vacuum pump and wait 15 minutes. Vacuum should not rise above 800 microns. If unable to obtain 500 microns, or vacuum rises above 800 microns over 15 minutes period, discontinue evacuation, pressurize and check for leaks. Repair any leaks found and repeat the step 2. 3.Close valve to the vacuum pump and stop pump. 4.When sure of a tight, well evacuated system, charge with refrigerant. Charging the System (For systems with capillary tube or fixed orifice metering device) Before checking the system charge, make sure that the outdoor unit and indoor coil must be an approved match per the unit specification. The indoor conditions should be within 2 F of the desired comfort conditions. ! WARNING - Do not vent refrigerant to the atmosphere! It is a violation of federal law to do so. If the refrigerant needs to be removed from a system to correct the charge inside, always use a recovery or recycling device. ! WARNING - To prevent personal injury, wear safety glasses and gloves when handling refrigerant. 9
-
 1
1 -
2
-
3
-
4
-
5
-
 6
6 -
 7
7 -
 8
8 -
 9
9 -
 10
10 -
 11
11 -
 12
12 -
 13
13 -
 14
14 -
 15
15 -
 16
16 -
17
 |
 |
