Haier HPG1400BSS User Manual - Page 5
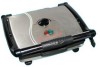
Using Your Panini Maker
 |
UPC - 688057393896
View all Haier HPG1400BSS manuals
Add to My Manuals
Save this manual to your list of manuals |
Page 5 highlights
English USING YOUR PANINI MAKER Conditioning the Grill Plates The grill surfaces must be conditioned before each use. To condition the surfaces, lightly coat with vegetable shortening. Grilling For best results, use thick, crusty breads such as Italian, French and focaccia. The grill can also be used to grill vegetables, meats, poultry and fish. 1. Place the drip tray under the drip spout to catch the grease. Attach the slotted side of the drip tray to the base. 2. Lightly coat the grill surfaces with vegetable shortening. 3. Close the top grill plate and plug the appliance into a standard 120v, 60 Hz outlet. Both the Red Power Indicator Light and the Green Ready-to-Cook Light will turn on. 4. Turn the temperature dial to the desired setting. Allow the grill to preheat to the proper temperature. Some initial smoking may occur. This is normal for new appliances being used for the first time and will not occur after a few uses. Note: Always preheat the grill to ensure even grilling and do so with the top plate in the closed position. 5. The Green Ready-to-Cook Light will turn on again when the unit is preheated and has reached the selected temperature and is ready for use. 6. Lift the top open by the handle, being careful not to touch any hot surfaces such as the housing and the grill plates. 7. Place food onto the grill surfaces and lower the handle. Cook the food to the desired doneness. The Green Ready-to-Cook Light will cycle on and off during the cooking process in order to maintain the proper temperature. The floating hinge system on the right side of the unit is used to adjust for various food thicknesses. Note: Always grill with the lid in the closed position. Do not use sharp objects or attempt to cut food on top of the grill plates. 8. When the food is finished cooking, turn the temperature dial to the "OFF" position. Use a heat-safe plastic or wooden spatula to remove cooked food from the grill. Do not use metal utensils, as they may damage the grill surface. 9. If the grill is to be used again immediately, lower the top plate to preserve the heat while the food is being prepared for grilling. 10. Unplug the unit and allow it to cool completely before draining the remaining grease and before cleaning the unit. Always clean the grill plates and accessories after each use to remove any residue that may have accumulated. See the "CLEANING AND MAINTENANCE" section on the 4 next page.
-
 1
1 -
 2
2 -
 3
3 -
 4
4 -
 5
5 -
 6
6 -
 7
7 -
 8
8
 |
 |
