Hamilton Beach 52737 Use & Care - Page 9
Troubleshooting - product
 |
UPC - 040094527373
View all Hamilton Beach 52737 manuals
Add to My Manuals
Save this manual to your list of manuals |
Page 9 highlights
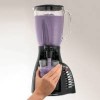
840153700 ENv02.qxd 6/22/06 5:16 PM Page 9 Quick Cleaning Quick cleaning should only be used to rinse the blender between batches of processing the same food. When the processing of a single type of food is finished, the blender should be disassembled and thoroughly cleaned as instructed in "How to Clean." To quick clean, pour 2 cups (500 ml) warm water in jar and add 1 drop liquid dishwashing detergent. Run the blender on ICY DRINK for 10 seconds. Flush soapy water through dispenser until cleaned. Discard soapy water. Rinse blender jar with clean water. Flush clean water through dispenser until cleaned. This function is not a substitute for regular cleaning as instructed in "How to Clean." This function should never be used when blending any mixture containing eggs, milk, or any other dairy products, meats, or seafood. Troubleshooting PROBLEM Blender leaks. Ice not crushed. Does not blend well. Does not dispense. Spout leaks. Cannot remove cutting assembly. PROBABLE CAUSE/SOLUTION • For plastic jar models, make sure outer and inner jar are assembled correctly. • Tighten cutting assembly on jar. • Make sure gasket is in place on cutting assembly. • Make sure gasket is not damaged. If damaged, please call our toll-free customer service number to order a replacement. • Make sure lid with filler cap is pushed down tightly on jar. • See ice crushing instructions in "Blending Specific Foods" section. • Make sure enough liquid has been added. A minimum of 8 ounces (250 ml) is recommended. • Make sure blender is ON. • Tighten dispenser cap (located above spout). • Loosen collar by holding jar and tighten cutting assembly counterclockwise. 9
-
 1
1 -
2
-
3
-
 4
4 -
 5
5 -
 6
6 -
 7
7 -
 8
8 -
 9
9 -
 10
10 -
 11
11 -
 12
12 -
 13
13 -
 14
14 -
15
-
16
-
17
-
18
-
19
-
20
-
21
-
22
-
23
-
24
-
25
-
26
-
27
-
28
-
29
-
30
-
31
-
32
-
33
-
34
-
35
-
36
 |
 |
