Harbor Freight Tools 61317 User Manual
Harbor Freight Tools 61317 - Wet/Dry Shop Vacuum Manual
 |
View all Harbor Freight Tools 61317 manuals
Add to My Manuals
Save this manual to your list of manuals |
Harbor Freight Tools 61317 manual content summary:
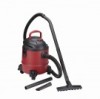
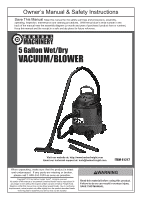
- Harbor Freight Tools 61317 | User Manual - Page 1
- Harbor Freight Tools 61317 | User Manual - Page 2
always be followed, including the following: READ ALL INSTRUcTIONS BEFORE USING THIS AppLIANcE To reduce the risk of fire, electric shock, or injury: 1. Do not leave appliance when plugged in. Unplug from outlet when not in use and before servicing. 2. Do not expose to rain. Store indoors. 3. Do - Harbor Freight Tools 61317 | User Manual - Page 3
.5, et seq.) 26. The warnings, precautions, and instructions discussed in this instruction manual cannot cover all possible conditions and situations that may occur in a risk of electric shock. check with a qualified electrician or service person if you are in doubt as to whether the outlet is - Harbor Freight Tools 61317 | User Manual - Page 4
to the Assembly Diagram near the end of this manual. Assembly 1. Open the Upper Clasps located on each side of the Tank. See Figure A. Upper clasp 5. Secure the Caster Supports to the Tank Base, using one Screw for each Caster Support. See Figure B. Screw Figure A 2. Lift and remove the Upper - Harbor Freight Tools 61317 | User Manual - Page 5
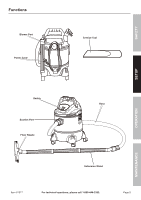
SAFETy Functions Blower port power cord crevice Tool SETUp OpERATION Switch Suction port Floor Nozzle Hose Extension Wand Item 61317 For technical questions, please call 1-800-444-3353. Page 5 MAINTENANcE - Harbor Freight Tools 61317 | User Manual - Page 6
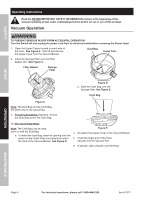
SAFETy SETUp Operating Instructions Read the ENTIRE IMpORTANT SAFETy INFORMATION section at the beginning of this manual including all text under subheadings therein before set up or use of this product. Vacuum Operation TO pREVENT SERIOUS INJURy FROM AccIDENTAL OpERATION: Turn the - Harbor Freight Tools 61317 | User Manual - Page 7
SAFETy 7. USE PROPER EXTENSION CORD. Make sure your extension cord is in good condition. When using an extension cord, be sure to use one heavy enough to carry the current your product will draw. An undersized cord will cause a drop in line voltage resulting in loss of power and overheating. Table - Harbor Freight Tools 61317 | User Manual - Page 8
SAFETy Blower Operation TO pREVENT SERIOUS INJURy FROM AccIDENTAL OpERATION: Turn the Switch off and unplug the power cord from its electrical outlet before removing the power Head. 1. Pull out on the tabs on the sides of the Upper Cover and pull up on it to remove it. 2. Clean the Tank out - Harbor Freight Tools 61317 | User Manual - Page 9
specifically explained in this manual must be performed only abnormal noise or vibration occurs, have the problem corrected before further use. cleaning, Maintenance, and is damaged, it must be replaced only by a qualified service technician. cleaning Filters To ensure proper operation, clean the - Harbor Freight Tools 61317 | User Manual - Page 10
SAFETy pLEASE READ THE FOLLOWING cAREFULLy THE MANUFACTURER AND/OR DISTRIBUTOR HAS PROVIDED THE PARTS LIST AND ASSEMBLY DIAGRAM IN THIS MANUAL AS A REFERENCE TOOL ONLY. NEITHER THE MANUFACTURER OR DISTRIBUTOR MAKES ANY REPRESENTATION OR WARRANTY OF ANY KIND TO THE BUYER THAT HE OR SHE IS - Harbor Freight Tools 61317 | User Manual - Page 11
Floating Block 13 Filter Basket 14 Suction Port 15 Upper Clasp 16 Lower Clasp 17 Tank 18 Water Drain Cap 19 Cord Hook 20 Caster Support part Description 21 Caster 22 Extension Wand 23 Floor Nozzle 24 Paper Dust Bag 25 Sponge Filter 26 Hose 27 Crevice Tool 28 Cloth Bag - Harbor Freight Tools 61317 | User Manual - Page 12
Limited 90 Day Warranty Harbor Freight Tools Co. makes every effort to assure that its products meet high quality and durability standards, and warrants to the original purchaser that this product is free from defects in materials and workmanship for the period of 90 days from the date of purchase.
-
 1
1 -
 2
2 -
 3
3 -
 4
4 -
 5
5 -
 6
6 -
 7
7 -
8
-
9
-
10
-
11
-
12
 |
 |
