Harbor Freight Tools 61317 User Manual - Page 6
Vacuum Operation
 |
View all Harbor Freight Tools 61317 manuals
Add to My Manuals
Save this manual to your list of manuals |
Page 6 highlights
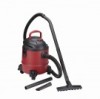
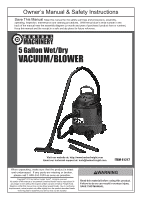
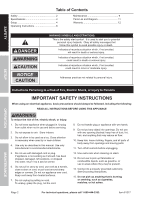
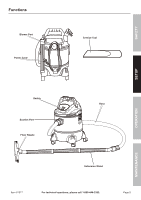
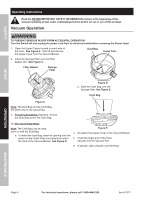
SAFETy SETUp Operating Instructions Read the ENTIRE IMpORTANT SAFETy INFORMATION section at the beginning of this manual including all text under subheadings therein before set up or use of this product. Vacuum Operation TO pREVENT SERIOUS INJURy FROM AccIDENTAL OpERATION: Turn the Switch off and unplug the power cord from its electrical outlet before removing the power Head. 1. Open the Upper Clasps located on each side of the Tank. See Figure A. Then lift and remove the Upper Cover from the Vacuum/Blower. Dust Bag Outlet Filter 2. Insert the Sponge Filter over the Filter Basket (21). See Figure c. Filter Basket Sponge Filter Figure D b. Slide the Cloth Bag over the Sponge Filter. See Figure E. cloth Bag Figure c Note: The Dust Bag and the Cloth Bag are used only for dry vacuuming. 3. For wet vacuuming: If present, remove the Dust Bag and/or the Cloth Bag. 3b. Dry vacuuming setup: Note: The Cloth Bag can be used alone or with the Dust Bag. a. To install the Dust Bag, insert its opening over the portion of the Outlet Filter protruding from within the Tank of the Vacuum/Blower. See Figure D. Figure E 4. Re-attach the Upper Cover to the Vacuum/Blower. 5. Insert the larger end of the Hose securely into the Vacuum Port. 6. If desired, slide a Nozzle onto the Hose. OpERATION MAINTENANcE Page 6 For technical questions, please call 1-800-444-3353. Item 61317
-
 1
1 -
 2
2 -
 3
3 -
 4
4 -
 5
5 -
 6
6 -
 7
7 -
 8
8 -
 9
9 -
 10
10 -
 11
11 -
 12
12
 |
 |