Harbor Freight Tools 62519 User Manual - Page 12
Mounting Plain Ended Blades
 |
View all Harbor Freight Tools 62519 manuals
Add to My Manuals
Save this manual to your list of manuals |
Page 12 highlights
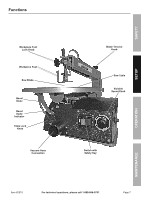
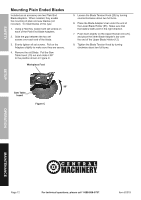
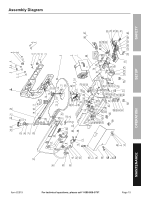
Safety Mounting Plain Ended Blades Included as an accessory are two Plain End Blade Adapters. When installed, they enable the mounting of plain end saw blades (not included). To install blades of this type: 1. Using a Hex Key, loosen both set screws on each of the Plain End Blade Adapters. 2. Slide the gap between the two set screws over each end of the blade. 3. Evenly tighten all set screws. Pull on the Adapters slightly to make sure they are secure. 4. Remove the old Blade. Pull the Saw Table Insert (10) out and rotate it 90° to the position shown in Figure C. Workpiece Foot 5. Loosen the Blade Tension Knob (23) by turning counterclockwise about two full turns. 6. Place the Blade Adapter's bar under the end of the Lower Blade Holder (65). Make sure that the blade's teeth point in the right direction. 7. Push down slightly on the Upper Rocker Arm (20), and place the other Blade Adapter's bar over the end of the Upper Blade Holder (12). 8. Tighten the Blade Tension Knob by turning clockwise about two full turns. 90° Saw Table Insert Figure C Setup Operation Maintenance Page 12 For technical questions, please call 1-888-866-5797. Item 62519
-
 1
1 -
2
-
3
-
4
-
5
-
6
-
 7
7 -
 8
8 -
 9
9 -
 10
10 -
 11
11 -
 12
12 -
 13
13 -
 14
14 -
 15
15 -
 16
16
 |
 |