Harbor Freight Tools 63061 User Manual - Page 11
General Operating Instructions
 |
View all Harbor Freight Tools 63061 manuals
Add to My Manuals
Save this manual to your list of manuals |
Page 11 highlights
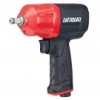
Safety General Operating Instructions 1. If an automatic oiler is not used, add a few drops of Pneumatic Tool Oil to the Airline Connection before use. Add a few drops more after each hour of continual use. 2. Connect the air hose to the air inlet of the tool. 3. Push and snap socket (not included) onto the Anvil. 4. To tighten, set the Regulator Knob to one of the three Forward torque settings. 5. Place the socket over the nut you wish to tighten. 6. Hold the Handle firmly and place other hand on top of Housing. Then gently squeeze the Trigger. 7. To loosen, set the Regulator Knob to the Reverse setting. 8. Place socket over desired nut, hold Handle firmly and gently squeeze the Trigger. 9. If the tool requires more force to accomplish the task, verify that the tool receives sufficient, unobstructed airflow (CFM) and increase the pressure (PSI) output of the regulator up to the maximum air pressure rating of this tool. CAUTION! TO PREVENT INJURY FROM TOOL OR ACCESSORY FAILURE: Do not exceed the tool's maximum air pressure rating (90 PSI). If the tool still does not have sufficient force at maximum pressure and sufficient airflow, then a larger tool may be required. 10. When the nut is tightened or loosened, release the Trigger. 11. The amount of actual torque may vary depending on the cleanness and condition of the threads and other factors. If tightening critical components, check the actual torque applied to the fastener with a mechanical torque wrench (not supplied). 12. To prevent accidents, turn off the tool, detach the air supply, safely discharge any residual air pressure in the tool, and release the throttle and/or turn the switch to its off position after use. Clean external surfaces of the tool with clean, dry cloth. Then store the tool indoors out of children's reach. Setup Operation Maintenance Item 63061 62835 For technical questions, please call 1-888-866-5797. Page 11
-
 1
1 -
2
-
3
-
4
-
5
-
 6
6 -
 7
7 -
 8
8 -
 9
9 -
 10
10 -
 11
11 -
 12
12 -
 13
13 -
 14
14 -
 15
15 -
 16
16
 |
 |
