Harman Kardon 150 Owners Manual - Page 3
Installation
 |
View all Harman Kardon 150 manuals
Add to My Manuals
Save this manual to your list of manuals |
Page 3 highlights
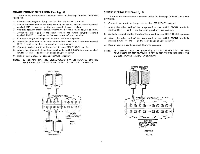
INSTALLATION VENTILATION Although your new receiver rarely develops high heat, it is recommended that you leave the back of the cabinet open. If this is not possible, provide several large holes or slots as low and as high up in the cabinet back as possible. As an alternative, holes may be provided in the sides, bottom or top of the cabinet. Remember that really effective ventilation requires provision for cool air to enter at the bottom and hot air to leave at the top. A minimum clearance of two (2) inches should be allowed on each side and in the rear, between the chassis and the cabinet, and three (3) inches are required above it. Isolate any accessories which might interfere with ventilation. For example, do not drape plastic or rubber covered interconnecting cables over the equipment. POWER REQUIREMENTS Connect the AC line cord to any outlet furnishing 117 volts, 60 Hz AC current. The voltage may vary between 105 and 125 volts. Two auxiliary AC power outlets are provided on the rear panel of your receiver, one being alive at all times (unswitched) and the other being live only when the power switch is on (switched). Any accessory equipment (tape recorder, phonograph record player, etc.) may be connected to these receptacles. Only those connected to the switched receptacle will be controlled by the POWER switch on the front panel. FUSING A fuse is a safety device used to protect the receiver against possible damage due to overload or short circuits. The 150+ receiver employs five protective fuses. All five are located on the rear panel. The AC fuse labeled 5A-3AG is used to protect the power supply of the entire system. The other four fuses labeled 5A-3AG LEFT, RIGHT, FRONT and BACK, protect the output stages of the receiver. The output of your receiver has been designed to operate with a MAXIMUM of 5.0 amperes of current in each channel. Under certain conditions, it is possible to draw more than 5.0 amperes through the output stage which would, in turn, blow the speaker fuses. This could be caused by using multiple speaker systems where the total impedance falls below 4 ohms. (See SPEAKER IMPEDANCE). In the event of fuse failure, replace ONLY with the same fuse type used. NEVER replace with a fuse of a higher rating. To do so will NOT protect your receiver and could result in severe damage to it which will not be covered under the warranty policy. SPEAKER PLACEMENT (See Fig. 1) The speakers will be referred to as LEFT and RIGHT, FRONT and BACK. Placement of the back speakers will vary with your room size, seating arrangement and acoustics. At times, it may be advantageous to place the back speakers in line with the listener, either aiming them at the listener, the rear of the room or against the side wall. It has been acknowledged that omnidirectional speakers (i.e. Harman/Kardon HK50) serve well as back speakers in a 4-CH setup because they do not beam the sound at the listener. This gives the illusion of far greater airiness and comes closer to the sound at a live concert. We have illustrated several ways of arranging the back speakers. Some experimentation may be required before you obtain optimum sound dispersion and total surround sound. If you listen predominantly to classical music it is recommended to reflect the back speakers off the walls, or aim them away from the listener. This will tend to soften the sound and create a more natural ambience. If you listen predominantly to contemporary music it may be advantageous to place the back speakers in the corners and beam them into the room. CONNECTING THE SPEAKERS Use any type of wire to connect your speakers to your receiver. However, it should be pointed out that the heavier the wire, the lower the loss of power. Ordinary lamp cord, or zip cord as it is sometimes called, is excellent for this application since it can be dressed easily around the molding and it is usually heavy enough to extend great lengths without an appreciable loss in power. Do not drive tacks or staples through the center of the wire since this can result in a short circuit which would either cut the volume level down considerably or short out the sound completely. It is permissible to use approximately 50.60 feet of heavy gauge speaker connecting wire for each speaker without loss of volume. CONNECT YOUR SPEAKERS WITH CARE, AVOID SHORTS. DO NOT CONNECT THE SPEAKERS WITH THE POWER ON. WORK CAREFULLY TRIMMING ALL LOOSE WIRES ON THE REAR OF THE SPEAKERS AND RECEIVER. THE RECEIVER HAS BEEN DESIGNED TO PREVENT DAMAGE FROM MOMENTARY ACCIDENTAL SHORTING. HOWEVER, REPETITIVE SHORTING CAN DAMAGE THE OUTPUT DEVICES. The 150+ has provisions for two pairs of speaker systems for the front channels, and another two pairs for the back. Any pair may be driven independently or a combination of two pairs may be driven, as selected by the MAIN and REMOTE Speaker Switches. Connect them to the receiver as instructed in the diagrams (Fig. 2 and Fig. 3), taking care not to confuse the FRONT and BACK, LEFT and RIGHT channels, and the plus and minus polarities. Sufficient care should be taken not to short circuit the plus and minus leads. SPEAKER IMPEDANCE Each speaker system connected to your 150+ must possess an impedance of from 4 to 16 ohms. Should you wish to drive two pairs of speaker systems simultaneously, they should all have an impedance of 8 ohms or more. It should be noted that it is not necessary to match the impedance of the speakers to the receiver since the 150+ is a solid state instrument and can accommodate all speakers ranging in impedance from 4 to 16 ohms without special transformers. 2
-
 1
1 -
 2
2 -
 3
3 -
 4
4 -
 5
5 -
 6
6 -
 7
7 -
 8
8 -
 9
9 -
10
-
11
-
12
-
13
-
14
-
15
-
16
-
17
-
18
 |
 |