Harman Kardon 75 Owners Manual - Page 10
Tuning, Selecting, Monophonic, Stereo, Broadcast, Indicator, Meter, Scale, Equalization, Noise
 |
View all Harman Kardon 75 manuals
Add to My Manuals
Save this manual to your list of manuals |
Page 10 highlights
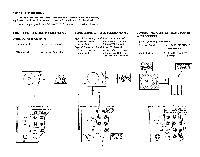
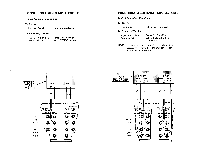
TUNING The tuning knob, located on the right side of the receiver is used to select the desired station when your FUNCTION switch is in the FM, STEREO FM, or AM position. SELECTING MONOPHONIC OR FM STEREO BROADCAST Under normal use for all FM broadcasts the function selector switch should be placed in the STEREO FM position. Your receiver is equipped with a stereo sensing circuit which will automatically determine whether your unit is receiving monophonic or stereophonic broadcasts, and then automatically adjust the mode of operation. If the station is transmitting stereo, your receiver will automatically switch on the multiplex section and you will hear the broadcast in full stereo. Should the station conclude broadcasting in stereo, your receiver will automatically switch back to monophonic reception. Should you receive a weak stereo signal whose quality has been degraded by noise or poor signal conditions, and you wish to listen to this stereo broadcast monophonically, place the function selector switch in the FM position. STEREO INDICATOR A stereo indicator is located adjacent to the tuning meter and operates in conjunction with the STEREO FM position of the Function switch. The indicator visually shows the reproduction of FM stereo through your receiver. To tune for FM stereo proceed as follows: 1. Place the function selector switch in the STEREO FM position. 2. Tune to the station of your choice using your tuning meter for precise and accurate tuning. Your stereo indicator will now show if you are tuned to a stereo program. If the indicator is off, the program you are listening to is being broadcast monophonically. TUNING METER Your Receiver incorporates a D'Arsonval movement tuning meter for precise and accurate tuning. The FM balance meter is designed to operate on a null or "zero" center principle. Therefore, the meter pointer should always be at the dead center position of your meter dial for optimum listening performance. To accomplish this, rotate your tuning knob slowly, in one direction towards the station of your choice. As you tune through the station you will notice the pointer swinging from the left or right past the zero center. THE CORRECT POINT for minimum distortion and optimum FM reception is when the pointer is resting at the "zero" center position. When used in the AM position, simply tune for maximum indication. DIAL SCALE The dial scale on your receiver is marked with three scales, namely, an FM frequency scale (88-108 MHz), a logging scale (0-100), and an AM frequency scale. Since most FM stations operate at frequencies which are not whole numbers (such as 96 MHz as compared to 96.3 MHz), ideally, each megahertz division on the frequency scale should be divided into 10 parts to enable the user to pinpoint the location of the station. This would require a dial scale which would be longer than the front panel. The logging scale which is divided into 100 equal parts provides a means of finding your favorite station, once you have noted its position on the logging scale. For example, in New York City, WQXR operates at 96.3 MHz. After locating this station through the use of the frequency scale (between 96 and 98 MHz), you find that the pointer may fall on 4.2 on the logging scale. Make a note of this setting. For future tuning to WQXR simply set the pointer to 4.2 on the logging scale. EQUALIZATION In order to achieve good reproduction of the wide range of frequencies in music and to make necessary adjustment for the limitations of the recording technique, record manufacturers have found it necessary to modify the actual frequency response of the music while it is being recorded. Thus, to avoid overcutting and consequent distortion, a measured and deliberate reduction is effected in low frequency response by selecting a "turnover frequency" and recording attenuated response below that point. To assure optimum signal to noise at the high frequency end when the record is played at home, the highs are deliberately exaggerated during the recording process. A measured and deliberate boost is affected above a certain frequency. This combination of deliberate exaggeration at the low and high ends of the frequency spectrum can be expressed in a recording curve. When the record is played a mirror image of that curve should be available so that the ideal "flat" response may be achieved. The PHONO position of the function switch automatically introduces the proper equalization. HUM AND NOISE In any high fidelity installation, hum may be caused by the interconnection of a record player, tuner and amplifier, as a result of the cables and different grounds. If hum is experienced with your receiver, disconnect everything but the speakers from the receiver. If hum persists, reverse the AC line cord. Plug in the record player and if hum appears, reverse the record player power plug and connect a single lead from the record player chassis to the ground post on the rear of the receiver chassis. Connect your other devices in this manner. CAUTION: Hum may also be induced by defective connecting cables or by running these cables too close to a strong AC field. 9
-
 1
1 -
2
-
3
-
4
-
 5
5 -
 6
6 -
 7
7 -
 8
8 -
 9
9 -
 10
10 -
 11
11 -
 12
12 -
 13
13 -
 14
14 -
 15
15 -
16
-
17
-
18
 |
 |