Harman Kardon AVR 1510 Owners Manual - Page 11
Types of Home Theater System Connections - arc
 |
View all Harman Kardon AVR 1510 manuals
Add to My Manuals
Save this manual to your list of manuals |
Page 11 highlights
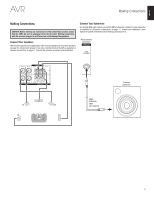
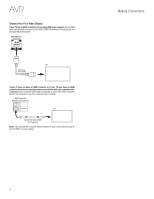
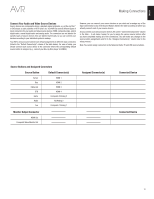
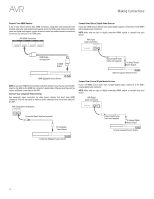
ENGLISH AVR Types of Home Theater System Connections Types of Home Theater System Connections There are different types of audio and video connections used to connect the AVR to your speakers, your TV or video display, and your source devices. The Consumer Electronics Association has established the CEA® color-coding standard. Analog Audio Connection Front Left/Right Center Surround Left/Right Subwoofer Color White/Red Green Blue/Gray Purple Digital Audio Connection Coaxial Optical Input Color Orange Black Analog Video Connection Composite Video Color Yellow Speaker Connections Speaker cables carry an amplified signal from the AVR's speaker terminals to each loudspeaker. They contain two wire conductors, or leads, that are differentiated in some way, such as with colors or stripes. The differentiation helps you maintain proper polarity, without which your system's lowfrequency performance can suffer. Each speaker is connected to the AVR's speakeroutput terminals using two wires, one positive (+) and one negative (-). Always connect the positive terminal on the speaker, which is usually colored red, to the positive terminal on the receiver, which is colored as indicated in the Connection Color Guide Table, above. The negative terminals on the speakers and the AVR are black. Your AVR uses binding-post speaker terminals for the Front Left/Right speakers that can accept bare-wire cables or banana plugs in addition to spring-clip terminals for the Center and Surround speakers that only accept bare-wire cables. For the springclip terminals, press the levers to open the connectors, insert the bare wires into the openings, and release the levers to secure the wires. Bare-wire cables are installed as shown below: 1. Unscrew Cap 2. Insert Bare Wire 3. Tighten Cap Banana plugs are inserted into the hole in the middle of the terminal cap, as shown below: A. Tighten Cap B. Insert Banana Connector into Hole in Cap Subwoofer Connections The subwoofer is a speaker dedicated to reproducing only the low (bass) frequencies, which require more power. To obtain the best results, most speaker manufacturers offer powered subwoofers that contain their own amplifiers. Use a single RCA audio cable to make a line-level (non-amplified) connection from the AVR's Subwoofer connector to a corresponding input jack on the subwoofer. Although the AVR's purple subwoofer output looks similar to a full-range analog audio jack, it is filtered so that only the low frequencies pass through it. Don't connect this output to any device other than a subwoofer. Source Device Connections Audio and video signals originate in source devices (components where a playback signal originates) such as your Blu-ray Disc or DVD player, CD player, DVR (digital video recorder) or other recorder, tape deck, game console, cable or satellite television tuner, an iPod or iPhone (connected to the AVR's USB port) or an MP3 player. The AVR's FM/AM tuner also counts as a source, even though no external connections are needed other than the FM and AM antennas. Separate connections are required for the audio and video portions of the source device's signal, except for digital HDMI connections. The types of connections you use will depend upon the capabilities of the source device and of your TV or video display. Digital Audio Connections - HDMI There are two types of audio connections - digital and analog. Digital audio signals are required for listening to sources encoded with digital surround modes, such as Dolby Digital and DTS, or for uncompressed PCM digital audio. Your AVR has three types of digital audio connections: HDMI, coaxial and optical. Do not use more than one type of digital audio connection for each source device. However, it's okay to make both analog and digital audio connections to the same source. Your AVR is equipped with rear-panel HDMI input and output connectors. HDMI technology enables high-definition digital audio and video information to be carried using a single cable, delivering the highest quality picture and sound. If your TV or video display device has an HDMI input connector, make a single HDMI connection from each HDMI-enabled source device to the AVR. Usually, a separate digital audio connection is not required. The AVR's HDMI output connection contains an Audio Return Channel (ARC) that carries a digital audio signal from your TV or video display back to the AVR. It allows you to listen to HDMI devices that are connected directly to your TV (such as an Internet connection) without making an additional connection from the device to the AVR. The ARC signal is active when the TV source is selected. See System Settings, on page 29, for more information. The HDMI connector is shaped for easy plug-in (see illustration, below), and HDMI cable runs are limited to about 10 feet (3m). If your video display has a DVI input and is HDCP-compliant, use an HDMI-to-DVI adapter (not included), and make a separate audio connection. Always connect the colored (+) terminal on the AVR to the (+) terminal on the speaker (usually red), and the black (-) terminal on the AVR to the (-) terminal on the speaker (usually black). IMPORTANT: Make sure the ( + ) and ( - ) bare wires do not touch each other or the other terminal. Touching wires can cause a short circuit that can damage your receiver or amplifier. 11
-
 1
1 -
2
-
3
-
4
-
5
-
 6
6 -
 7
7 -
 8
8 -
 9
9 -
 10
10 -
 11
11 -
 12
12 -
 13
13 -
 14
14 -
 15
15 -
 16
16 -
17
-
18
-
19
-
20
-
21
-
22
-
23
-
24
-
25
-
26
-
27
-
28
-
29
-
30
-
31
-
32
-
33
-
34
-
35
-
36
-
37
-
38
-
39
-
40
-
41
-
42
-
43
-
44
-
45
-
46
-
47
 |
 |
