Harman Kardon CODA Owners Manual - Page 3
Harman Kardon CODA Manual
 |
View all Harman Kardon CODA manuals
Add to My Manuals
Save this manual to your list of manuals |
Page 3 highlights
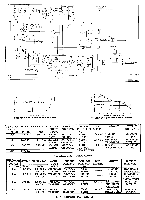
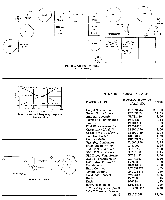
required for excellent high fidelity performance in your living room. When the red dots on each control are set in the vertical (12 o'clock) position, an "average" overall response is provided. RUMBLE FILTER Many records, particularly your older favorites, may produce an objectionable low frequency signal that is often strong enough to be picked up by the phono cartridge and introduced into the playback system. Known as "rumble" this undesirable signal can be eliminated in the CODA by the use of the "Rumble Filter" which is controlled by a three position slide switch located on the front panel. In position 0 the rumble filter is not connected and frequency response is essentially flat to 20 cycles. When the switch is placed in position 1 the response is slowly rolled off and at 20 cycles is reduced by 6 decibels. Frequency response is reduced by 12 decibels at 20 cycles when the switch is placed in position 2. Position 1 will be most useful where a minimum amount of rumble appears in the system while position 2 gives additional low frequency which will be most helpful in cases of heavy rumble. AM ANTENNA The Harman-Kardon ferrite loopstick, built into the Coda comprises all the antenna required for the finest in noise-free local AM reception. In locations more removed from metropolitan areas, an outdoor antenna may be required. This should consist of a single wire, as long as is reasonably practical, located away from large metal objects, power lines or electrical machinery. Connect one end to the "AM" terminal of the ANTENNA terminal strip on the rear of the tuner-amplifier chassis. FM ANTENNA The internal FM antenna provided will usually be adequate for reception of all local and moderately distant FM stations. In those situations requiring an external FM antenna, connections should be made between "G" and "FM". A single dipole will be useful when stations to be received are located in opposite directions from each other. A non-directional dipole should be used if the stations are located in dispersed directions. A folded dipole antenna with reflector will provide maximum efficiency and may increase the number of distant FM stations your Coda can receive. SPEAKER CONNECTIONS A unique method of connecting one or two loudspeakers is incorporated in the Coda in order that you derive maximum enjoyment from thin superlative instrument with any of today's fine speaker systems. If you wish to play a remote speaker with the Coda and use either one or both together, remove the Jumper wire between terminals "A" & "B" at the rear of the tuner-amplifier chassis marked "SPEAKER". Connect external speaker wires to terminals "G" and "B". (For best operation this speaker should have an impedance of 8 ohms, although a slight mismatch will not affect the overall response.) To select the Coda's speakers slide the front panel Speaker Selector Switch to position "A". To select the remote speaker slide the switch to position "B". To operate both speaker systems at the same time, slide the switch to the position marked "AB". Due to the fact that the Speaker Selector Switch changes the transformer connections as well as the speaker connections in any position, either or both speakers will be fed at the correct matching impedance and optimum results will be obtained. GENERAL INSTRUCTIONS In general, every control on a well designed, honestly considered high fidelity instrument has a specific useful function, related to each of the other controls. Although this cannot be a full treatise on the subject, an explanatory note on the relationship of the various front panel controls will doubtless prove useful in organizing and clarifying them for the user. Beginning with the function selector, choose the type of program material you plan to listen to (radio, phono, etc.). Choose the correct record equalization setting for the particular record you are to play. With Loudness Contour Selector in the uncompensated position, turn the loudness (volume) control to as high a level as you can briefly allow. (This to permit you to make the remaining adjustments while you are listening at your own maximum efficiency.) Now adjust the Bass and Treble Tone Controls to correct for the electromechanical characteristics of the loudspeaker you are using and for the acoustic characteristics of the room in which you are listening. Modify each until settings are chosen which in your total system create the proper sense of aural balance and evenness. Now reduce the loudness (volume) control setting to a level somehwat lower than normal listening level in your room. You will note that the full bodied-lifelike quality you experienced at high listening levelhas disappeared. With all other controls unchanged, select the best contour setting for you. Do this by switching quickly through the several positions until you find the one which most nearly duplicates the full bodied sound you enjoyed at high level. Now turn the loudness control up to the level at which you wish to listen - (perhaps the maximum level you can permit in your home) - and listen. You'll find that there is automatic compensation of contour wherever you set the loudness control thereafter. In fact, under normal circumstances, you should not find it necessary to readjust the tone controls or the contour selector once having chosen the correct settings for you, your room and your system. MAINTENANCE AND REPAIR Due to the conservative design and high quality components of the Coda, no routine maintenance other than yearly tube-checking is required. Should trouble develop, however, only the most qualified service man should be employed, as special equipment and training is required to properly align a high fidelity FM receiver.
-
 1
1 -
 2
2 -
 3
3 -
 4
4 -
 5
5 -
 6
6 -
 7
7 -
 8
8
 |
 |
