Harman Kardon HK210 Owners Manual - Page 2
Installation
 |
View all Harman Kardon HK210 manuals
Add to My Manuals
Save this manual to your list of manuals |
Page 2 highlights
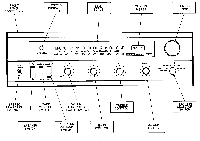
INTRODUCTION Congratulations. You have just purchased one of the finest stereophonic music systems available. Your receiver represents the successful culmination of many years of intensive research in solid-state technology - a product literally born of space-age development. Before you lies the magnificent sound of recorded music as you have never heard it before. We know how anxious you are to install and listen to your new receiver. However, a few moments spent in reading this instruction booklet will pay vast dividends in the ultimate enjoyment of your music system. Please retain this booklet for it contains valuable information. INSTALLATION 1. POWER REQUIREMENTS Connect the AC line cord into any outlet furnishing 117 volts, 50 or 60 cycle AC current. The voltage may vary between 105 and 125 volts. An auxiliary AC power outlet is provided on the rear panel of your receiver. Any accessory equipment (tape recorder, phonograph record player, etc.) may be connected to this receptacle and will be controlled by the ON-OFF switch on the front panel of your receiver. 2. MOUNTING ON A SHELF You may wish to mount your new Harman-Kardon receiver on a free stand- ing wall shelf or perhaps within a bookcase. Be certain when installing your receiver to provide adequate ventilation. Allow at least two inches of open space on all sides of the unit, and do not place any books or other objects on top of the receiver cabinet. The rear panel surface of your receiver has been designed as a heat dissipating device for the output transistors. This area will become warm under normal use and should not be cause for concern. MOUNTING INTO A CUSTOM EQUIPMENT CABINET If you wish to mount your receiver into a custom cabinet installation, please follow the information provided on the custom mounting instructions in the rear of this manual. Detailed mechanical dimensions and all other pertinent information is provided with these instructions. CONNECTING YOUR SPEAKERS FOR STEREO OPERATION Speakers usually sound best if placed along the same wall and are spaced approximately 8 to 10 feet apart. It may be necessary to experiment with speaker placement until best results are obtained. Use any type of wire to connect your speakers to your receiver. Lamp cord is excellent and may be easily dressed around the molding for an inconspicuous and neat installation. Do not drive staples or tacks through the center of the wire for this may short out the two sections and will decrease the overall volume or short out the speakers entirely. It is permissible to use approximately 50 feet of speaker connecting wire for each speaker without loss of volume. 1. Connect one length of lamp cord to the left speaker. (This is the speaker on your left as you face the speakers.) 2. Attach the other end of the lamp cord to the + and - terminals marked SPEAKER LEFT, located on the rear of the receiver. 3. Similarly connect another length of lamp cord to your right speaker. 4. Attach the other end of the lamp cord to the + and - terminals marked SPEAKER, RIGHT. This completes your speaker connections. Your receiver is a solid state device which does not contain audio output transformers. It is therefore not necessary to match the impedance of your speakers to the receiver. Your unit will perform perfectly with any speaker which has an impedance of 4, 8 or 16 ohms. CONNECTING THE FM ANTENNA Due to the exceptionally high sensitivity of your receiver, the 48" wire supplied is sufficient for all but the most difficult locations. When using the antenna supplied connect one end of the 48" wire to the "RIGHT" FM antenna terminal as shown. Horizontal placement of the antenna will yield optimum reception. The antenna may be tacked to the back of the molding behind the equipment or to the shelf you use. As FM signals are in the same broadcast frequency range as TV signals, they are affected by the same external conditions. Just as TV reception is improved, you can improve your FM reception with an external antenna. When using an external antenna connect both leads of the antenna wire to the two FM antenna terminal posts on the rear of your receiver. CONNECTING THE AM ANTENNA The AM loopstick fastened on the rear of your receiver comprises all the antenna usually required for normal signal areas. In more remote locations• an additional outdoor antenna may be required. This should consist of a single wire, as long as is reasonably practical. It must be kept away from large metal objects, power lines or electrical machinery to insure reception without extraneous noise. Attach this length of wire to the AM terminal of the ANTENNA TERMINAL STRIP. CONNECTING A STEREO TAPE RECORDER Connect the two tape recorder output cables to the LEFT and RIGHT TAPE AMP/AUX input receptacles on the rear of your receiver. With the Function Switch in the TAPE AMP/AUX position you will now be able to play your stereo tapes. In order to make a recording, connect the inputs of your tape recorder to the TAPE OUT receptacles on the rear of the receiver. This will allow you to make a stereophonic recording while simultaneously listening to the program material through your speaker system.
-
 1
1 -
 2
2 -
 3
3 -
 4
4 -
 5
5 -
 6
6 -
 7
7 -
 8
8 -
9
 |
 |
