Harman Kardon HKTS 2 MkII Owners Manual - Page 5
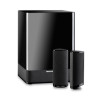
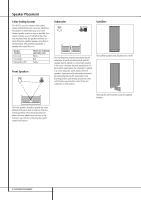
Trigger On/Off Switch - 2 1 channel speaker system
 |
View all Harman Kardon HKTS 2 MkII manuals
Add to My Manuals
Save this manual to your list of manuals |
Page 5 highlights
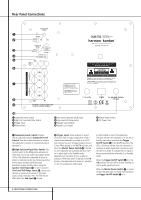
Rear Panel Connections 3 Phase Switch: This switch determines whether the subwoofer's piston-like action moves in and out in phase with the main speakers. If the speakers were to play out of phase, the sound waves produced by the subwoofer would be cancelled out, reducing bass response. This phenomenon depends in part on the relative placement of the speakers in the room. In most cases, the Phase Switch 3 should be left in the NORMAL position. However, it does no harm to experiment with the Phase Switch 3, and you may leave it in the position that maximizes bass response. 4 Line-Level Subwoofer (SUB) Input: Connect the subwoofer output of a receiver with digital surround sound decoding, such as Dolby* Digital or DTS®, to this input. This input bypasses the subwoofer's internal crossover circuitry, and should only be used with a filtered signal. If your receiver does not have digital decoding, you should use the Line-Level Full-Range Inputs 5 instead. 5 Line-Level Full-Range Inputs: Connect the line-level subwoofer output or preamp output(s) of your receiver or amplifier to these inputs. If your receiver does not have a separate subwoofer output, use a Y-adapter (not supplied) to bridge the receiver's preamp output to the main amp input for that channel, and connect the long end of the adapter to the corresponding line-level input on the subwoofer. If your receiver has only a single subwoofer output, you may connect it to either the left or right linelevel input on the subwoofer, and no Y-adapter is needed. 6 Speaker-Level Outputs: If you are using the Speaker-Level Inputs 7 on the subwoofer, you should connect these bindingpost terminals to your front left and right speakers, remembering to maintain polarity by connecting the (+) terminal on the subwoofer to the (+) terminal on the speaker, and the (-) terminal on the subwoofer to the (-) terminal on the speaker. If you are not using the Speaker-Level Inputs 7, then connect your front left and right speakers directly to your receiver or amplifier. See pages 9 through 12 for further information on speaker connections. 7 Speaker-Level Inputs: Connect these binding-post terminals to the main left and right speaker terminals of your receiver or amplifier, if your receiver or amplifier does not have a linelevel subwoofer output. Remember to maintain polarity by connecting the (+) terminal on the receiver/amplifier to the (+) terminal on the subwoofer, and the (-) terminal on the receiver/ amplifier to the (-) terminal on the subwoofer. 8 Master Power Switch: Place this switch in the "•" position to power-on the subwoofer. The subwoofer will then be either in the Standby mode or completely on, depending on the position of the Trigger On/Off Switch 2. 9 AC Power Cord: Make sure to plug this cord into an active, unswitched electrical outlet for proper operation of the subwoofer. The cord should not be plugged into the accessory outlets found on some audio components. REAR PANEL CONNECTIONS 5
-
 1
1 -
 2
2 -
 3
3 -
 4
4 -
 5
5 -
 6
6 -
 7
7 -
 8
8 -
 9
9 -
 10
10 -
 11
11 -
12
-
13
-
14
-
15
-
16
 |
 |
