Harman Kardon MAS 102 CD Player and Amplifier Owners Manual - Page 5
Front-Panel Controls, Controller and Amplifier
 |
View all Harman Kardon MAS 102 CD Player and Amplifier manuals
Add to My Manuals
Save this manual to your list of manuals |
Page 5 highlights
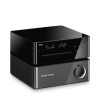
ENGLISH mas system 0 Note: Controls are the same for all models. 0 2 Front-Panel Controls Controller and Amplifier 3 7 8 4 9 6 5 A The mas system use touch-sensitive controls. To use a control, tap gently on its lit icon. NOTE: Controls are the same for all models. 0 Power: Turns the mas system on or places it in Standby mode. To completely power off the unit, unplug the power supply. 1 Message Display: The time and messages are displayed in this two-line text display. 2 CD Slot: Load compatible discs here. 3 Skip/Scan Forward/Reverse: These buttons function differently, depending on the current source: • iPod, CD or USB: Press and release the Forward Button to skip to the next track. Press the Reverse Button twice to skip to the previous track. Press and hold the Scan Forward/Reverse Buttons to scan forward or reverse within a track. • Radio: Press and release the Preset +/- Button on the Remote Control or the Skip Forward/Reverse Button on the front panel to select the next/previous programmed preset station. Press and hold the Skip/Scan Forward/Reverse Button to scan quickly through the stations. When you release the button, the tuner continues to scan until it finds a station of acceptably strong signal quality, and then it stops. To stop the scan before a station is found, press the Forward/ Reverse button again. 4 Play/Pause: Each tap toggles between the Play and Pause functions. 5 Stop: Fully stops playback. 6 Eject: When a CD is loaded, tap here to eject it. 7 USB Port A: Connect a compatible USB device here to enjoy playback of audio MP3 or WMA files. Although most USB flash and hard-disk drives in the FAT32 file format, as well as many MP3 players, are compatible with the MAS 101/MAS 102 and MAS 111 systems, due to the wide variety of manufacturers, playback cannot be guaranteed. Do not connect an iPod or iPhone to this port. Do not connect a personal computer or any peripherals to this port. 8 Line-In Jack (Line Input): Connect a stereo 3.5mm male-to-male cable (not included) to the headphone or line-level output on a portable player or other device. 9 Headphone Jack: Outputs a stereo signal for private listening through most headphones that are equipped with a stereo 3.5mm plug. A Volume Control: Increases or decreases the volume. 5
-
 1
1 -
 2
2 -
 3
3 -
 4
4 -
 5
5 -
 6
6 -
 7
7 -
 8
8 -
 9
9 -
 10
10 -
 11
11 -
12
-
13
-
14
-
15
-
16
-
17
-
18
-
19
-
20
 |
 |
