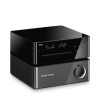
Harman Kardon MAS 102 CD Player and Amplifier Owners Manual - Page 6
Rear-panel connections, Controller
 |
View all Harman Kardon MAS 102 CD Player and Amplifier manuals
Add to My Manuals
Save this manual to your list of manuals |
Page 6 highlights
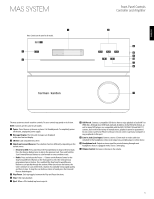
mas system Rear-panel connections Controller 2 3 4 0 3 7 5 B 1 8 A C 6 0 FM Antenna Terminal: Connect the included FM antenna wire here. 1 DAB Antenna Terminal (MAS 111 Only): Connect the included DAB antenna wire lead here to enjoy programming from digital DAB, DAB+ or T-DMB-Audio radio stations available in your area. 2 USB Port B: Connect a compatible USB device here to enjoy playback of audio MP3 or WMA files. Although most USB flash and hard-disk drives in the FAT32 file format, as well as many MP3 players, are compatible with the MAS 101, MAS 102 and MAS 111 systems, due to the wide variety of manufacturers, playback cannot be guaranteed. Do not connect an iPod or iPhone to this port. Do not connect a personal computer or any peripherals to this port. 3 Optical 1/2 and Coaxial 1/2 Digital Audio Inputs: Connect a source device's optical or coaxial digital audio output to the corresponding input. Only the uncompressed PCM format is supported. 4 TV and AUX Analog Audio Inputs: Connect the analog audio outputs of a television or any source device to enjoy playback through the high-performance mas system. 5 Phono Input: Connect the outputs of a moving-magnet (MM) type turntable to this input. Do not connect any other type of turntable to this input, and do not connect the outputs of an MM-type turntable to any other analog audio inputs on the MAS 101, MAS 102 or MAS 111 without using a phono preamp, available separately from many electronics stores. 6 Input: To enjoy playback of audio materials stored on a compatible iPod (see page 4), connect The Bridge III dock. Make sure the insert for The Bridge III is installed, and install the appropriate dock adapter for your iPod within the insert, as shown in Figure 1 on page 10. 7 Analog Audio Outputs: Connect these outputs to the analog audio inputs of an audio recorder. When a source connected to the mas system is playing, the signal will be available at these outputs for recording. 8 Coaxial Digital Audio Output: Connect this output to the coaxial digital audio input of a digital audio recorder. When a source connected to the mas system is playing, the signal will be available at this output for recording. NOTES: • The mas system does not convert analog sources to the digital domain, or digital sources to the analog domain for recording. • It is the user's responsibility to comply with all laws pertaining to the copying of audio materials. 9 Output to Amplifier: Connect the included ribbon cable to this connector and to the corresponding connector on the MAS amplifier. This cable passes audio signals from the controller to the amplifier, and it transfers DC power from the amplifier to the controller. If this cable is ever damaged, do not use it, and contact Harman Kardon, for a replacement. A RS-232 Serial Port: This port is used only for system upgrades. Do not connect it to any devices unless instructed to do so at the time a system upgrade is released. B Update Switch: This switch is used only for system upgrades. Leave it in the "N" position for normal operation unless instructed to switch it to the "U" position to install a system update. 6
-
 1
1 -
 2
2 -
 3
3 -
 4
4 -
 5
5 -
 6
6 -
 7
7 -
 8
8 -
 9
9 -
 10
10 -
 11
11 -
 12
12 -
13
-
14
-
15
-
16
-
17
-
18
-
19
-
20
 |
 |
