Harman Kardon SC3 Owners Manual - Page 4
Right
 |
View all Harman Kardon SC3 manuals
Add to My Manuals
Save this manual to your list of manuals |
Page 4 highlights
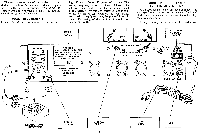
an inconspicuous and neat installation. Do not drive the staples or tacks through the center of the wire for this may short out the two sections and will decrease the overall volume or short out the speakers entirely. 1) Plug one end of the speaker cable into the receptacle on the rear of your left speaker (this is the speaker on the left as you face the speakers). 2) Plug the other end of the speaker cable into the LEFT speaker receptacle on the rear of the receiver. 3) Similarly connect the other speaker cable to your right speaker. 4) Attach the other end of the speaker cable to the receptacle marked RIGHT on the rear of the receiver. 5) Your receiver is now connected for stereo operation. CONNECTING THE FM ANTENNA Due to the exceptionally high sensitivity of your receiver the 48" wire supplied is sufficient for all but the most difficult locations. The balanced antenna input is designed to accept a 300 ohm antenna, indoor or outdoor type. When using the antenna supplied connect one end of the 48" wire to either FM antenna terminal. Horizontal placement of the antenna offers maximum polarization for optimum reception. The antenna may be tacked to the back of the molding behind the equipment or to the shelf you use. In more remote locations, an outside Yagi, folded di-pole or omni-directional antenna is recommended (Jerrold/Taco FMP 8, FMP 10, FMP 16. For the greatest gain, an 8 to 14 element Yagi designed for the FM band is suggested. A Yagi however, is very directional and it may be desirable to use an antenna rotor if a full 360° coverage is required. For reception in the suburbs, an outside folded di-pole or omni-directional di-pole is recommended. CONNECTING A STEREO TAPE RECORDER Since most stereo tape recorders include their own record and playback pre-amplifiers, it is not desirable to connect the output of the recorder into any low level input receptacles. This will result in overloading of the low level stage and cause distortion. Connect the two tape recorder output leads to the LEFT and RIGHT TAPE AMP/AUX receptacles on the rear panel of the receiver. This will enable you to play back your stereo tapes. To make. a recording, connect the inputs of your recorder to the LEFT and RIGHT TAPE OUT receptacles. This will enable you to make a stereophonic recording with the proper recording equalization as determined by your recorder, while simultaneously listening to the program material through your speaker system. The recording signals from the TAPE OUT receptacles are unaffected by the tone controls or volume setting of the receiver to insure an absolutely flat response. CONNECTING A MONOPHONIC TAPE RECORDER If a monophonic tape recorder is to be used with your receiver connect the recorder output to either the LEFT Or RIGHT TAPE AMP/AUX input receptacle located on the rear panel. This will enable you to play back your monophonic tapes. If your recorder is stereo playback but records monophonically, connect the output as described in the previous section on connecting a stereo tape recorder. Connect the input for recording monophonically as described below. Connect the input of your recorder to either the LEFT or RIGHT TAPE OUT receptacle. This will enable you to record monophonically while simultaneously listening to the program through the receiver and speakers. 4 Operation IProcedure Every control on this receiver serves a specific useful function and is important for the proper operation of your stereo system. It is important to note that under no circumstances should this receiver be operated without either a speaker or resistive load (4 115 W) across both the output terminals. ON/OFF SWITCH The power switch is located on the volume control. In the full counter-clockwise position the receiver is off. Rotate the control clockwise to turn the receiver on. TUNING CONTROL The TUNING CONTROL is located directly to the right of the dial glass and is used to select the desired station. VOLUME CONTROL The VOLUME CONTROL on your receiver is essentially two controls in one, mechanically tied together, to be operated by one knob. The volume control varies both channels simultaneously and is used to adjust the volume level of program material fed into the stereo system. Its effect can be modified by the special Harman-Kardon CONTOUR switch. BALANCE CONTROL The nature of stereophonic reproduction is such that it requires two identical channels to attain the highest degree of faithfulness and spatial distribution. Any variation in the efficiency of one channel as compared to the other will disturb this relationship. As there may be slight differences between the location of the two speakers, tape heads, cartridge coils, etc., your receiver includes a special control to balance one channel against the other. Sufficient range is covered by this control to permit rebalancing of the overall system even in extreme cases where unbalance exists. It should be noted that the BALANCE control may be set anywhere within its range of adjustment to attain system balance.
-
 1
1 -
 2
2 -
 3
3 -
 4
4 -
 5
5 -
 6
6
 |
 |
