Harman Kardon ST5 Owners Manual - Page 5
tightening
 |
View all Harman Kardon ST5 manuals
Add to My Manuals
Save this manual to your list of manuals |
Page 5 highlights
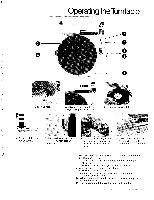
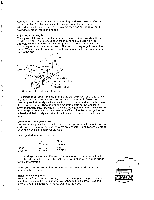
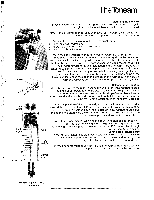
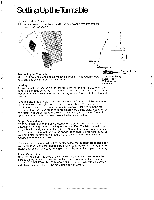
/11 Keyway Counter weight Locking -* Collar 0 0.250.50.75 - to 1.251.51.75- 2.0 2.5- Restrictor The Tonearm Mounting the Tonearm Move the cue lever to the rear. Using the control arm, move the cartridge to the right end of its travel. Now move the cue lever forward. Note: If the cue lever cannot easily be moved fully forward, the lift gears have become engaged in shipment. To correct this condition: 1. Connect the power line cord of the ST5 to an AC outlet. 2. Turn the power switch on. 3. Allow the unit to run for about 20 seconds. 4. The turntable will shut off. Move the slide-weight and mounting collar toward the cartridge end of the tonearm to expose the black connector. Note the key rib on the connector. Hold the arm with the key rib up. With the other hand, hold the counterweight shaft firmly and press down on the carriage nameplate to prevent the vertical bearing from twisting during installation of the tonearm. Introduce the tonearm UNDER its restrictor. Gently push the arm all the way into its keyed socket. Secure the tonearm by screwing in the locking collar; gently hand tighten only. If the cartridge is slightly twisted by normal tightening of the locking collar, loosen the collar and straighten the cartridge. Then hold the cartridge vertically straight while you re-tighten the locking collar. Balancing the Tonearm Move the cue lever to the rear. The tonearm will rise into the restrictor notch. Slip the counterweight onto the back of the counterweight shaft. If you encounter difficulty, lubricate the shaft with a drop of water. Move the cue lever forward and move the slide-weight back so that its front surface lines up with the rear-most graduation on the tonearm (0 grams). Adjust the position of the counterweight so that the tonearm is balanced in the middle of its vertical travel. Push or pull the counterweight with a rotating motion for precise positioning. If the arm rises into the restrictor notch, pull the counterweight toward the front of the turntable. If the arm falls, push the counterweight toward the back of the turntable. Note: If the tonearm falls, even with the counterweight back as far as it will go, your cartridge weighs over 10 grams, and requires a heavier counterweight. This weight, Harman Kardon model 15G, is available through Grip your Harman Kardon dealer. Setting the Tracking Force Now that your tonearm is balanced, position the front surface of the slide- weight at the graduation corresponding to the vertical tracking force Gram specified by the manufacturer of your cartridge. Weight The tracking force must be at least .75 gram for correct tripping, however, it is possible for the unit to track at lesser forces. Control Arm Example: 1 gram tracking force shown
-
 1
1 -
 2
2 -
 3
3 -
 4
4 -
 5
5 -
 6
6 -
 7
7 -
 8
8
 |
 |
