Harman Kardon TD392 Owners Manual - Page 7
Controls, Functions
 |
View all Harman Kardon TD392 manuals
Add to My Manuals
Save this manual to your list of manuals |
Page 7 highlights
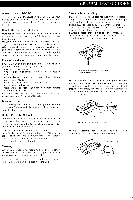
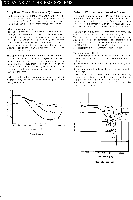
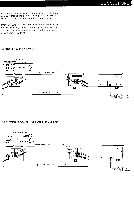
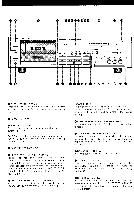
® RECORD INDICATOR For indication that the tape is being recorded. PLAY BUTTON (PLAY) Press this button to start playback. PAUSE BUTTON (PAUSE) Press this button to temporarily stop playback or recording. This button also activates the record standby mode when pressed simultaneously with the RECORD button. 0 PAUSE INDICATOR For indication that the pause mode has been activated. 0 FAST FORWARD BUTTON (F.FWD) Press this button to quickly advance the tape in the same direction as it is played. C) RECORD MUTE BUTTON (REC MUTE) This button allows you to create a silent segment of tape at any time while recording. The button is a momentary contact type and wi ll not lock in the depressed position. The record mute feature wil l only operate while the button is held in the depressed position. 0 TAPE MONITOR INDICATOR This indicates the position of the TAPE MONITOR switch. 0 TAPE MONITOR SWITCH (tape monitor) This switch determines whether the output of the cassette deck is the tape playback signal or the input (source) signal. 0 METER WEIGHTING SWITCH (meter weighting) Press this switch to the "on" position, and high frequencies are emphasized and displayed on the PEAK LEVEL METER corresponding to the saturation response of the tape. This allows you to set the optimum recording level independent of the frequency content of the music signal. PEAK LEVEL METER The level of the signal being recorded or played is displayed clearly on this meter. ® INPUT LEVEL CONTROL KNOB (INPUT LEVEL) This knob adjusts the record level of the input signal. See the "Recording Level Adjustment" section on page 7. 0 DOLBY NR SWITCH (NR) Depress this switch for recording or playback using the Dolby NR system. The green DOLBY NR indicator (for Btype) or the amber one (for C-type) illuminates according to the DOLBY NR TYPE selector position. Press the switch again to turn off the Dolby NR system. ® DOLBY NR TYPE SELECTOR (type) For selection of the Dolby B- or C-type NR system. Depress this switch to select the Dolby C-type NR system. Press it again to select the Dolby B-type system. )rt CONTROLS AND FUNCTIONS 0 DOLBY NR INDICATOR For indication that Dolby B or C noise reduction circuitry is activated. MPX FILTER SWITCH (mpx filter) The MPX filter is a high frequency filter that has very little effect below 1 6kHz, but has 30dB attenuation at 1 9kHz, the frequency of the FM stereo pilot signal. Depress and release this switch (to the "on- position) when recording from an FM stereo tuner or receiver. However, to appreciate the ultrawideband frequency response of the TD392, depress this switch (to the "off" position) when recording all other sources, such as a turntable, tape deck, etc. BIAS TONE BUTTON (bias tone) When this button is held in the depressed position, high and low frequency test tones are fed to the right and left channels, respectively. The BIAS FINE TRIM knob can be precisely adjusted by observing its effect on the level of these test tones. See the "Bias Fine Trim Feature- section on page 8. e) BIAS FINE TRIM KNOB (BIAS FINE TRIM) For precise adjustment of the bias used during recording. See the "Bias Fine Trim Feature" section on page 8. 0 INPUT BALANCE CONTROL KNOB (INPUT BALANCE) This knob is used to restore the input level balance when the levels of the right and left channels are extremely different or to deliberately upset the input level balance as you like. Usually, it is set at the center. Turn it clockwise, the recording level of left channel is decreased. Turn it counterclockwise, the recording level of right channel is decreased. ® OUTPUT LEVEL CONTROL KNOB (OUTPUT LEVEL) This control knob adjusts the output level of the line OUTPUT jacks and the HEADPHONES jack. ® SUB-PANEL DOOR Press the upper right part of the SUB-PANEL DOOR and it wil l release. Then open the door to access the sub-panel switches and controls.
-
 1
1 -
 2
2 -
 3
3 -
 4
4 -
 5
5 -
 6
6 -
 7
7 -
 8
8 -
 9
9 -
 10
10 -
 11
11
 |
 |
