Harman Kardon TD392 Owners Manual - Page 9
Recording, Operations
 |
View all Harman Kardon TD392 manuals
Add to My Manuals
Save this manual to your list of manuals |
Page 9 highlights
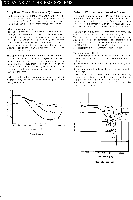
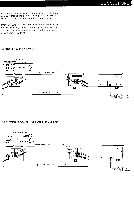
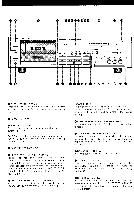
Bias Fine Trim Feature The optimal amount of recording bias varies from tape to tape. The bias fine trim feature is provided to enable precise adjustment for such variations. The high frequency range tends to be attenuated if the bias current is higher than the optimum value while it tends to be boosted if the bias current is less than the optimum value. Less than optimum bias also increases the amount of distortion in a recording. This unit assists the user in determining the precise amount of bias, and therefore in obtaining the widest and flattest frequency response. Operate as follows: 1 . Insert a cassette tape in the CASSETTE COMPARTMENT and press the TAPE SELECTOR button corresponding to the type of tape being used. 2. Set the DOLBY NR switch to the "off" position. 3. Depress the TAPE MONITOR switch to the "tape" position and make certain that the TAPE MONITOR indicator i l luminates. 4. Press the RECORD and PLAY buttons together to start recording. 5. Hold the BIAS TONE button in. A 400Hz signal and a 12.5kHz signal are recorded in the left and right channels, respectively. 6. Compare the left and right channel PEAK LEVEL METER readings. If the amount of bias is optimum, the left and right channels wi l l have the same reading. Turn the BIAS FINE TRIM knob counterclockwise (toward the direction marked as "hi cut") if the right channel reading exceeds the left channel reading or clockwise (toward the direction marked as "hi boost") if the left channel reading exceeds the right channel reading. If the right channel reading exceeds the left channel reading. PEAK LEVEL METER - - -- - - LEFT dB RIGHT -20 -15 -10 .O -5 -3 000 0 0I -FIt +13 +5 +8 DO LEFT RIGHT BIAS FINE TRIM Turn the knob counterclockwise. - hi cut hi boost If the left channel reading exceeds the right channel reading. PEAK LEVEL METER LEFT dB RIGHT -20 -15 -10 -15 -13 1 +1 +3 415 +18 m=0000 DO LEFT dB RIGHT BIAS FINE TRIM Turn the knob clockwise. - hi cut hi boost RECORDING OPERATIONS Record Mute When the TD392 is in the record mode, the RECORD MUTE button can be used to create a silent space on the tape. Depressing the RECORD MUTE button cuts the signal to the record circuitry. This feature only functions while the button is held in the depressed position. Record mute is especially convenient when recording from a source that has excessive noise between selections. Erasing Recorded Signals When a new recording is made on a recorded tape, the recorded sound on that part of the tape is automatically erased. To erase a recorded tape without making a new recording, operate as follows: 1. Check to be sure that erase-prevention tabs of the cassette are not broken out. Then insert a cassette tape in the CASSETTE COMPARTMENT. If broken, cover the holes with adhesive tape. 2. Set the INPUT LEVEL control knob to the "0" position. 3. Press the TAPE SELECTOR button corresponding to the type of the tape. 4. Press the RECORD and PLAY buttons at the same time. 5. The portion of the tape that passes the tape heads wil l be erased. Cassette Tape and Corresponding Tape Selector Settings The table below shows several types of major brand tapes and the corresponding tape selector settings. Position LN CrO2 METAL MAXELL UD1 * XLI XLI-S XLII MX XLII-S AD * SA * MA AD -S SA-X MA-R TDK AR AR-X SONY HF-S HF-ES HF-PRO UCX UCX-S Metal-S Metal-ES PS-I AXIA (FUJI) GT-1 GT-II DENON DX-3 DX-4 HD-6 HD-S DX-M BASF PRO-I PRO -II PRO-IV Tapes with the mark (#1 are the standard reference tapes.
-
 1
1 -
2
-
3
-
 4
4 -
 5
5 -
 6
6 -
 7
7 -
 8
8 -
 9
9 -
 10
10 -
 11
11
 |
 |
