Hayward Aqua Connect® Aqua Connect® Operations Manual - Page 16
Manage, Sub-Accounts, Save and Return, Pool Settings, Access, Update, Logout, Disable a Sub-Account
 |
View all Hayward Aqua Connect® manuals
Add to My Manuals
Save this manual to your list of manuals |
Page 16 highlights
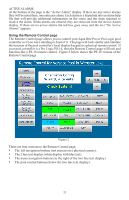
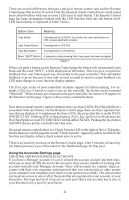
• When you are done entering information, select Add from the bottom of the page. If the information is complete and the username is unique you will be taken to the Site Listing page. At this point the sub-account has been created but is has not been given access to one or more pools. • The sub-account you just created is a View Only Account. If you want it to be a User Account then return to the Account Settings page and click on the Manage Sub-Accounts link from the Account Management field near the bottom of the page. This takes you to the Manage Sub-Accounts page. The Manage Sub-Accounts page contains a table of all of the sub-accounts that you have created. The left most column contains links to the individual accounts. Click on the link for the account you wish to change. • In the top field ("Sub-Account Details") there is a drop down box labeled "Ac- cess". Change the value in the drop down box to User. • Click on the Save and Return button on the bottom of the page. This will return you to the Site Listing page. At the Site Listing page select the pool (or the first pool) that you want the sub-account to have access to. This will take you to the Dashboard page for that pool. • Select Pool Settings from the left hand navigation column. This takes you to the Pool Settings page. Scroll to the bottom of the page and click on the Manage Access button. This will take you to the Pool Management page. • The lower field on this page is called Unit Access. It contains a table showing each sub-account created and managed by your Manager Account. The rightmost column of that table shows the privileges of that sub-account on this pool. There is a drop down box to select access level and a check box to enable alarm warning email notifications. The default levels are "No Access" and no notifications. • Go to the drop down box for this sub-account and select either "Read Only" or "Read/Write" to provide access to the sub-account. Check the notifications box if you would like the sub-account to receive alarm warning emails. "Read/Write" allows the sub-account to change pool configuration and control pool features while "Read Only" does not. • Once you have configured access to this pool, click on the Update button at the bottom. You should get a yellow message near the top of the page that says "The Unit Access has been updated". At this point select Home at the top of the page to return to the Site Listing page. Select the next pool and follow the same procedure that you did with this pool. • If this is the last pool that you wish the sub-account to access, then select Logout from the top navigation row. • Login to the sub-account with the username/password you just defined. Make sure that the sub-account is able to see all of the pools that you provided access to. SUB-ACCOUNT MANAGEMENT PROCEDURES The Manager Account that created the sub-account can modify sub-account privileges at any time. Disable a Sub-Account Should it become necessary to eliminate a sub-account: • Go to Account Settings and then go to the bottom of the page and select the Manage Sub-Accounts link. You are now at the Manage Sub-Accounts page. • In the left most table column click on the sub-account you wish to disable. • Use the "Access" drop down box in the "Sub-Account Details" field. Changing the drop down box value to "Disabled" essentially deletes the account (although you can re-activate it later). • Click on the Save and Return button at the bottom of the page. This will return you to the Site Listing page. 14
-
 1
1 -
2
-
3
-
4
-
5
-
6
-
7
-
8
-
9
-
10
-
 11
11 -
 12
12 -
 13
13 -
 14
14 -
 15
15 -
 16
16 -
 17
17 -
 18
18 -
 19
19 -
 20
20 -
 21
21 -
22
-
23
-
24
-
25
-
26
-
27
-
28
-
29
-
30
-
31
-
32
 |
 |
