Hayward Electric Spa Heater Spa Heaters - Page 5
Installation, below, surface, above, speed
 |
View all Hayward Electric Spa Heater manuals
Add to My Manuals
Save this manual to your list of manuals |
Page 5 highlights
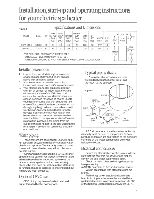
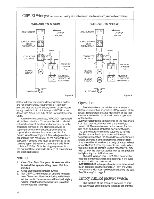
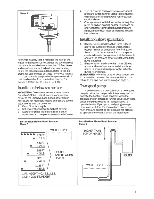
Figure 6 0 • PSI 5 filter gets so dirty that it restricts the flow of the water to the heater. Do not adjust the switch unless the heater is installed more than two (2) feet below surface of spa water. If adjustment is necessary, follow the procedure as outlined. Refer to the diagrams for approximate settings for various heights. Your heater is equipped with a pressure switch that is adjustable from one to five pounds. The switch is factory set at 3 psi ± 3/4 psi. Installation below spa surface: ACAUTION: Do not remove any access covers from the C-SPA-XI until all sources of electrical power to the unit have been turned off or disconnected. Do not make any repairs or pressure switch adjustments with the power on. 1. Clean filter thoroughly. 2. Set heater thermostat to highest setting. 3 Start filter pump. Make sure all air is out of water lines and complete system is full of water. 4. Turn filter pump and power source off, adjust pressure switch control. Signal light on heater will indicate off when power is restored. See caution above. 5. Check pressure switch function by turning filter pump on and off causing heater to respond on or off. If heater is installed beyond pressure limits, a flow switch must be installed in water line to heater. Installation above spa surface: 1. If heater is installed less than three (3) feet above the surface of the spa water, install eyeball fittings or directional flow fittings on the end of the return water line to the spa to create adequate back pressure at the heater to operate the pressure safety switch when filter pump is running. 2. If heater is installed more than three (3) feet above surface of spa water, install as shown above to prevent drainage of water in heater during filter change. AWARNING: No valves or other obstructions are to be installed between the heater outlet and the return to the spa. See water piping on page 3. Two speed pump: In some cases, the pressure from a two speed pump is below the one pound minimum required to operate the heater. This is apparent when the pressure switch cannot be further adjusted. In these cases the pump must be run at high speed to operate heater. If your pump and piping arrangements are such that the required one pound minimum pressure cannot be obtained, do not attempt to operate the heater. Correct the installation. Installation Below Pool Surface Figure 7 AAA 2.3 FT. =1LB. WATER LEVEL 4.6 FT. =2 LB. 6.9 FT. = 3 LB. 9.2 FT. = 4 LB. HEATER INSTALLATION LEVELS 11.5 FT. = 5 LB. 1 FT. HEIGHT = 0.4331LBS. 1 LB. = 2.31FT. HEIGHT Installation Above Pool Surface. Figure 8 HIGHER THAN TOP OF HEATER WATER LEVEL HEATER 5
-
 1
1 -
 2
2 -
 3
3 -
 4
4 -
 5
5 -
 6
6 -
 7
7 -
 8
8
 |
 |
