Hayward HeatPro Heat Pro Owners Operations & Parts Manual - Page 10
Operating the HeatPro Heat Pump, Start-Up Procedures - heater heat pump
 |
View all Hayward HeatPro manuals
Add to My Manuals
Save this manual to your list of manuals |
Page 10 highlights
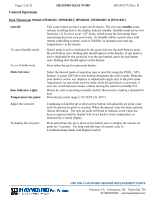
Page 10 of 22 HEATPRO HEAT PUMP HP13023772 Rev: D Operating the HeatPro Heat Pump NOTICE- Do not use this heat pump if any part has been flooded or submerged in water. Immediately call a qualified technician to inspect and replace any damaged part of the heat pump. Control System components must be replaced if submerged in water. Failure to do so will cause property damage. Before proceeding, MAKE CERTAIN there are no air or water leaks in any plumbing connections or piping and water is flowing through the unit as setup by the installer. NOTE: Damage caused by flow rates outside this range will void the warranty. CAUTION - Keep all objects off the top of the heat pump. Blocking airflow could damage the unit and will void the warranty. Start-Up Procedures 1. Apply power to the pool heater by plugging in the non-fused disconnect block or moving the circuit breaker to the "ON" position. 2. Place the pool heater thermostat in the "Standby" mode by ensuring the light above the "POOL" button (and "SPA" button for dual thermostat application) is not illuminated. If the light(s) are lit, depress the "POOL" button (and "SPA" button for dual thermostat application) to put the unit in "STANDBY" mode. 3. With the pool filter pump operating properly. 4. Push the "POOL" button to activate the unit and then set the pool Heat Pump thermostat to a temperature higher than the current pool water temperature. 5. Allow 5 Minutes for the Heat Pump to start. 6. When the unit starts, confirm that air is being discharged upward from the unit and the air is cooler than the ambient air. 7. Allow the Heat Pump to operate for 10-15 minutes in order for system pressure to stabilize. 8. If Heat Pump fails to start: a) Check water flow b) Ensure that power is On c) Refer to Performance Monitoring Section of this Manual USE ONLY HAYWARD GENUINE REPLACEMENT PARTS Pomona, CA Clemmons, NC Nashville, TN Tel: 908.351.5400 www.haywardpool.com
-
 1
1 -
2
-
3
-
4
-
 5
5 -
 6
6 -
 7
7 -
 8
8 -
 9
9 -
 10
10 -
 11
11 -
 12
12 -
 13
13 -
 14
14 -
 15
15 -
16
-
17
-
18
-
19
-
20
-
21
-
22
 |
 |
