Hayward Perflex® Extended-Cycle Owners Manual - Page 5
Warning
 |
View all Hayward Perflex® Extended-Cycle manuals
Add to My Manuals
Save this manual to your list of manuals |
Page 5 highlights
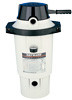
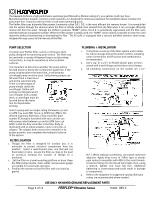
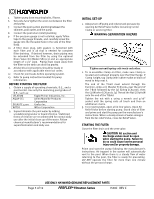
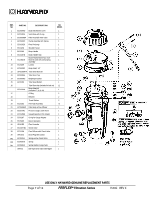
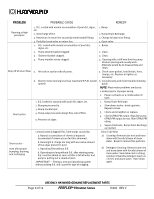
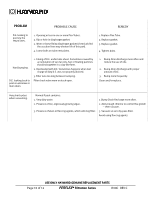
5. Tighten pump base mounting bolts, if loose. 6. Securely hand tighten the union nut between the filter and pump. 7. Connect the pool suction plumbing between the skimmer, pool outlet, and the pump. 8. Connect the pool return (inlet) plumbing 9. If the pressure gauge is not installed, apply Teflon tape to the gauge threads, and carefully screw the gauge into the threaded hole in the side of the filter body. 10. A filter drain plug, with gasket, is furnished with each filter and is all that is needed for complete filter draining. If desired however, drain piping may be extended from the filter by using the optional Drain Valve Kit (Model SP0723) and an appropriate length of 1-1/2" pipe. Piping must slope away from the filter so the tank can drain by gravity. 11. All electrical connections should be made in accordance with applicable electrical codes. 12. Check for joint leaks before operating system. 13. Refer to pump instruction booklet for pump information. BEFORE STARTING THE FILTER 1. Obtain a supply of operating chemicals, D.E., and a pool test kit. Use only the swimming pool grades of D.E., such as: CELATOM Eagle-Picher Industries, Inc. AQUA-CEL Johns-Manville Products Corporation DICALITE 4200 Grefco Inc. WITCO Witco Corporation 2. Superchlorinate the pool water by adding unstabilized granular or liquid chlorine. Stabilized forms of chlorine are recommended for normal daily use after the initial clean up of the water. Follow chemical manufacturer's recommendations for superchlorination and daily use. INITIAL SET-UP 1. Always turn off pump and relieve tank pressure by opening Air Relief Valve before loosening Center Clamp or servicing filter. WARNING-SEPARATION HAZARD Tighten nut until spring coils touch each other. 2. To re-assemble Clamp on filter, make sure Clamp is located and centered properly over the filter flange. If Clamp is tight, tap Clamp with rubber mallet or block of wood to help seat it. The end of the T-bolt must extend through the trunnion, slide a (1) Washer ECX500J4 over the end of the T-Bolt followed by the (2) Spring ECX500JS, then the (3) Washer ECX500J3. (4) Thread the Nut ECX360JN onto the end of the T-Bold. Tighten the nut with a using a wrench and 9/16" socket until the spring coils all touch and then an additional 2 turns. 3. To re-start system, open all in-line valves. Open Air Relief Valve before starting pump. Stand clear of filter and prime and start the pump per the manufacturer's instructions. When a steady stream of water emerges from the Air relief Valve, close Air Relief Valve. STARTING THE FILTER Close the filter drain and the vent valve. CAUTION All suction and discharge valves must be open when starting the pump. Failure to do so could cause severe personal injury and/or property damage. Prime and start the pump following the manufacturer's instructions. Air trapped in the system will automatically vent to the pool. When there is a steady flow of water returning to the pool, the filter is ready for precoating. DO NOT operate the filter for more than one minute without the precoat charge. USE ONLY HAYWARD GENUINE REPLACEMENT PARTS Page 5 of 12 PERFLEX™ Filtration Series IS50C REV C
-
 1
1 -
 2
2 -
 3
3 -
 4
4 -
 5
5 -
 6
6 -
 7
7 -
 8
8 -
 9
9 -
 10
10 -
 11
11 -
12
 |
 |