Hayward Perflex® Extended-Cycle Owners Manual - Page 6
Cleaning, Vacuuming, To Change Bump Handle Position, Gauge/inspection Port Adapter, Preventive - perflex extended cycle d e filters
 |
View all Hayward Perflex® Extended-Cycle manuals
Add to My Manuals
Save this manual to your list of manuals |
Page 6 highlights
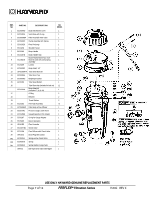
PRECOATING Scoop 5 lbs. (2.3 kgs.) of diatomite into the system through the skimmer as fast as the plumbing will take it. Note and record the pressure gauge reading after the diatomite has been added. This is the "precoat pressure." FILTERING Filtration starts as soon as the filter has been precoated. As the filter removes dirt from the pool water, the accumulated dirt causes a resistance to flow. As a result, the gauge pressure will rise and the flow will decrease. When the pressure rises 7-10 psi (.49-.70 Bar) above the precoat pressure, regenerate the filter. REGENERATION (Extending the Cycle) Stop the pump. Move the bump handle down slowly, then up briskly. Repeat 3 times. Restart the pump and filtration will resume at near the original flow and pressure. After each regeneration, and until the filter is cleaned, there may be a slight increase in the starting pressure. This is the result of dirt accumulating within the filter and is completely normal. CLEANING Cleaning is recommended when the gauge pressure rises more than 10 psi (.70 Bar) in less than a 24 hour period or when cloudy water returns to the pool for more than 30 seconds after regeneration. To clean, first stop the pump; then move the bump handle down slowly, then up briskly. Repeat 8 times. Open the vent valve (under bump cover), open the filter drain (Note: if the filter is installed below the pool water line, close the suction and return valves) and allow water and-dirt-toempty completely. After the filter has drained, and with the drain still open, run the pump for a few seconds to flush out any dirt remaining in the bottom of the filter. (Note: If the filter is installed below the pool water line, opening the suction valve for a few seconds with the pump off will adequately flush the unit.) Close the filter drain and the vent valve. Open the suction and return valves (when used). Start the pump and let the filter fill with water and repeat the CLEANING procedure. This completes the cleaning phase. The filter is now ready for recharging. Proceed as in STARTING THE FILTER and PRECOATING. VACUUMING Vacuuming can be performed directly into the filter whenever needed. For fastest results, regenerate the filter before and after each vacuuming operation. TO CHANGE BUMP HANDLE POSITION 1. Remove the bump handle grip. Push in tab at base of handle. Carefully pry the bump cover from the retaining groove and slide the cover off the handle. 2. Using a drift (or 10 penny nail), tap the pivot pin out of the filter head anchor point, freeing the end of the handle. 3. Rotate the bump handle to the alternate position and align the handle and the head anchor holes. Tap the pivot pin in place. 4. Reinstall the bump cover and grip. GAUGE/INSPECTION PORT ADAPTER The gauge/inspection port adapter provides an easy way to look into the filter, at the top area of the tube nest assembly. It gives a quick inspection capability to check tube nest conditions (algae, calcium or D.E. build-up, ect.) without requiring the removal of the filter head. It also allows you to wash off trapped debris and excess D.E. from between the Flex-Tubes; and from under the tube sheet, by spraying with a garden hose, or utilizing Hayward's Jet-Action Cleaning Wand (EC2024) that attaches to the end of a garden hose. To remove adapter- shut off the pump and valves. Open the air relief. Drain the water in the filter to a level below the adapter port. Unscrew the adapter, with the pressure gauge, counterclockwise. To Reinstall the adapter - thread the adapter, with the adapter o-ring in place, securely into the filter housing. PREVENTIVE MAINTENANCE While Perflex filters are basically resistant to the difficulties often encountered as a result of chemical build-up in swimming pools, it is important to keep in mind that the mineral content in a pool increases every day as a result of the chemicals and the normal water evaporation process. If the concentration of minerals is allowed to get too high, the minerals will form deposits on the Flex-Tubes inside the filter, and will eventually result in shortened filter cycles. The filter elements can be cleaned by washing with a garden hose. For best results, carefully brush the surface to remove fine particles. Do Not Pressure wash as it can damage the filter elements. You may find some debris on the filter elements , which may not be removed with hosing. After cleaning, thoroughly flush all affected parts with cold water. USE ONLY HAYWARD GENUINE REPLACEMENT PARTS Page 6 of 12 PERFLEX™ Filtration Series IS50C REV C
-
 1
1 -
 2
2 -
 3
3 -
 4
4 -
 5
5 -
 6
6 -
 7
7 -
 8
8 -
 9
9 -
 10
10 -
 11
11 -
 12
12
 |
 |