Hayward Pro Logic Model: AQL-CHEM-3 Installation and Operation - Page 4
Troubleshooting - pool controls
 |
View all Hayward Pro Logic manuals
Add to My Manuals
Save this manual to your list of manuals |
Page 4 highlights
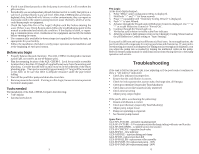
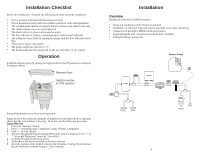
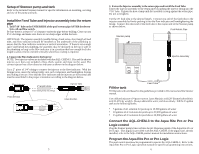
• If acid is not diluted properly or the feed pump is oversized, it will overshoot the pH correction. • Periodically use an independent pH and chlorine test kit to verify that pH is at a safe level, and that chlorine is at a safe level. If the AQL-CHEM probes are broken, depleted, dirty, fouled with oils, lotions, or other contaminants, they can report an inaccurate result to the system causing incorrect water chemistry, which at worst, could harm people or equipment. • Check the Aqua Rite Pro or Pro Logic's display each day before entering the water. If there is any Check System alarm, follow the troubleshooting guide in this manual to understand and rectify the condition. If the display is blank, or reporting a communications error, troubleshoot the equipment and rectify the failure before entering the water. • Use commercially available tie-down straps (not supplied) to fasten the tank, as appropriate for your locality. • Follow the installation checklist to verify proper operation upon installation and at the beginning of each pool season. Before you begin • Properly balance the pool chemistry. The AQL-CHEM-3 is designed to maintain a pool's pH, not correct an out-of-balance pool. • Plan the mounting location of the AQL-CHEM-3. Look for an easily accessible location that is less than 20' (length of supplied hose) away from the existing pool plumbing. Consider that the hole location must be on the underside of the return plumbing pipe. The injector assembly (approximately 10" long) will be mounted to this hole, so be sure that there is adequate clearance under the pipe before drilling. • Turn off the pool filter pump and drain the return line. • Remove power to the control. If wiring to a Pro Logic, be sure to remove power at the home's main panel. Tools needed The installation of the AQL-CHEM-3 requires the following: • 7/16" drill bit • flat head screwdriver 3 Pro Logic At the local display/keypad: 1. Press "Menu" until Configuration Menu is displayed. 2. Hold both "" for three seconds. 3. Press ">" repeatedly until "Chemistry Config. Wizard" is displayed. 4. Push "+" to start Wizard. 5. Advance through the Wizard until pH Reduction Control is displayed. Use "+" or "-" to set pH Reduction Control to "Forced On". 6. Continue through the Wizard and exit. 7. Verify that acid solution is visible at the flow indicator. 8. After the system is fully primed, return to the Chemistry Config. Wizard and set the pH Reduction Control setting to "Auto Sensing". Every pool is different and requires different acid feed rates. In most applications, the pool controller will compensate for varying pool sizes and chemistries. If your pool is overshooting (too much acid dispense) or timing out (not enough acid dispense), you can adjust the pump rate as needed by turning the numbered collar on the pump. Refer to Stenner pump manual for additional instructions relating directly to the pump operation and service. Troubleshooting If the tank is full but the pool's pH is not adjusting or if the pool control continues to show a "pH timeout" indication: • Check flow indicator for proper flow. • Ensure that the acid dilution is correct. • Check for leaks (pump tube, suction tube, discharge tube, all fittings) • Check pool chemistry (especially Total Alkalinity) • Check that suction line strainer is fully immersed • Check timeout setting • Adjust pump output higher If the pool's pH is overshooting the pH setting: • Ensure acid dilution is correct • Check pool chemistry (especially Total Alkalinity) • Adjust pump output lower • Pump not operating as expected • See Stenner pump manual Spare Parts GLX-SP-LP5TUBE - peristaltic (pumping) tube GLX-SP-UVTUBE - UV-resistant suction/discharge tubing with nuts and ferrules GLX-SP-STRAINER - weighted suction line strainer GLX-SP-CHECKV - injection check valve GLX-SP-FLO - flow indicator GLX-SADDLE - injection fitting and clamp GLX-SP-DB - replacement duck bill GLX-SP-ROLLER - replacement roller assembly GLX-SP-PUMP-120 -replacement pump - 120V GLX-SP-PUMP-240 -replacement pump - 240V 8
-
 1
1 -
 2
2 -
 3
3 -
 4
4 -
 5
5 -
 6
6
 |
 |
